Select your Product
STORMMASTER® SHAKE GENERAL INSTRUCTIONS
1.) GENERAL INSTRUCTIONS
The lifetime limited warranty option is only available for individual single‐family site built detached residence. A 50 year limited warranty would apply to all property owned by government agencies, corporations, limited liability companies, partnerships, trusts, religious organizations, schools, or school districts, condominiums, or cooperative housing arrangements, or installed on apartment buildings or any type of building or premises not used by individual homeowners for a single family site built detached residence.
These shingles are warranted against manufacturing defects and wind gusts up to 130 MPH WITH STANDARD 4 NAIL INSTALLATION ONLY FOR SHINGLES WITH THE “BUILT WITH HP42 TECHNOLOGY DESIGNATION”.
The StormMaster® Shake Limited Warranty can be obtained by visiting www.AtlasRoofing.com/Warranty, or by writing to: Atlas Roofing Corporation, Attn: Consumer Services Department, 802 Hwy 19 N., Suite 170, Meridian, Mississippi, 39307. The following instructions must be followed to qualify for protection under the StormMaster® Shake Limited Warranty.
Important: See special instructions below for Low Slope Applications. See special instructions below for Steep Slope/Mansard/ 6‐Nail application. To obtain stated area coverage and to achieve design performance and appearance, the directions on this package must be followed. Sealing of the adhesive strips on each shingle to the shingle beneath is created by heat from sunlight. Atlas Roofing Corporation also endorses the Asphalt Roofing Manufacturers Association’s (ARMA) recommendations for application details not specified within this text.
2.) ROOF DECK VENTILATION
Adequate ventilation under the roof deck must be provided to prevent harmful condensation in winter and heat build‐up in summer. These conditions can cause: A. Accelerated shingle weathering B. Deck rot and attic fungus C. Shingle distortion/ cracking due to deck movement D. Cosmetic blisters on the shingle surface. Atlas will not be responsible for damage to shingles as a result of inadequate ventilation. Ventilation provisions must meet or exceed current FHA Minimum Property Standards and conform to all building codes and regulations. To best ensure adequate ventilation and circulation of air, a combination of vents at the ridge and eaves should be used. All roof structures, especially mansard and cathedral type ceilings, must have complete through ventilation from eave area to the ridge area. FHA Minimum Property Standards require 1 square foot of net free attic vent area for every 150 square feet of attic floor area; or one square foot per every 300 square feet, if vapor barrier is installed on the warm side of the ceiling, or at least one half the ventilation area is provided near the ridge.
3.) ROOF DECK
These instructions are for the application of Atlas asphalt shingles to nominal 3/8″ or 7/16″ thick American Plywood Association (APA/TECO) rated, code approved plywood, OSB decks or minimum ¾″ actual thickness, wood decking . The plywood or non‐veneer (OSB) decks must comply with the roof deck specifications of APA/TECO. Solid wood decking must be well seasoned, not over 6″ (nominal) width, and fastened securely to each rafter. The deck surface must be clean, bare, gap free and flat. StormMaster® Shake shingles must not be applied to any surface other than roof deck types described here. Atlas also honors its Shingle Limited Warranty when Atlas shingles are installed on the Atlas CrossVent® Nailable Insulation panels. Atlas will not be responsible for the performance of its shingles if applied directly to non‐vented, insulated decks composed of perlite board, plastic foam, fiberboard, gypsum plank, lightweight concrete, cementitious wood fiber, or similar materials or to any decks with insulation installed directly to the underside of the decking, with the exception of CrossVent® Nailable Insulation. Spray foam insulation applied directly to the bottom of the decking will void the warranty. Atlas shingles may be installed over a roof system containing a radiant barrier material if: 1. the required full, flow through ventilation is maintained directly under the decking material in all cases, 2. the radiant barrier material is highly vapor permeable ( > 2 perms), and, 3. the radiant barrier is installed on the underside of or below the decking — not used as an underlayment above the decking. Spray‐on types of below deck vapor permeable radiant barriers will be considered only on a job by job basis, and only if tests confirm > 2 perms or greater vapor permeability.
4.) UNDERLAYMENT
Atlas highly recommends the use of high performance, ASTM 6757 compliant - Gorilla Guard® Everfelt™ or Summit® proprietary underlayment products for long term roof system performance and WeatherMaster® products self-adhering, waterproofing underlayment for critical areas, such as valleys and eaves. Atlas does not approve the use of any self-described, metalized or metal containing category of “Radiant Barrier”, as an asphalt shingle underlayment installed above the deck. Use of these types of radiant barrier would void the shingle warranty. Underlayment must be applied flat and unwrinkled. Building codes vary with geographic areas, and the installation must comply with local building codes or shingle manufacturer’s requirements, whichever is stricter. Shingles should be applied as soon as possible after the application of organic underlayment felt, which is not intended for prolonged exposure. Atlas recommends that the shingles be applied the same day as the felt underlayment application to avoid wetting and wrinkling. If an underlayment is used for prolonged dry-in, Atlas recommends Summit® Synthetic Underlayment as the dry-in underlayment, for up to 6 months exposure.
Standard Slope Application: Proper application requires that a single layer of approved underlayment be applied to decks with slopes 4:12 (> 18.4°) up to 21:12 (<60°) and consistent with all applicable building codes. This approved underlayment is a required roof assembly component to maintain a Class A fire rating of the deck assembly. Install underlayment over the entire deck, parallel to the eaves, overhanging 1/4″ to 3/8″, with fasteners placed 2″ from the deck edge, 12″ O.C. across the lower edge and with 2″ overlap parallel to eaves and with 4″ min. end lap, parallel to the rake. Underlayment end laps shall be staggered 6 feet apart from the adjacent courses. Corrosion-resistant drip edge should be placed over the underlayment at the rake and beneath the underlayment at the eaves.
Low Slope Application: 2:12 (>9.5°) up to 4:12 (<18.4°) (51mm/305mm) on slopes of 2″ to 4″ rise per foot, a double layer of approved underlayment over the entire deck surface is required. Atlas WeatherMaster Ice & Water products are highly recommended as the underlayment for low slope roofs to cover the entire deck prior to installing shingles. In low slope applications, slopes between 2:12 and 4:12, it is acceptable to install a single layer of WeatherMaster products either on partial or for entire deck coverage. As an alternative option, a double layer of approved underlayment can be installed over the entire deck surface is required. Starting with a 19” wide strip at eaves and overhanging the eaves 1/4” to 3/8”, cover the first 19” course with a full 36” wide strip. Expose the first course 17” and continue up the deck with 36” wide strips, lapping each course 19” over the preceding course - providing a 17” exposure. End laps for low slopes shall be of at least 12” overlap and staggered 6 feet apart. Install drip edge over the underlayment at the rake and beneath the underlayment at the eaves.
5.) FLASHING
All flashing should be in place before shingles are installed. Cap flashings of sheet metal and base flashings of metal or mineral surfaced roll roofing should be used at vertical surfaces such as chimneys, skylights, vents, walls, etc. All flashings should be sealed with asphalt plastic cement. Consult the Residential Asphalt Roofing Manual published by the Asphalt Roofing Manufacturers Association (ARMA) for details concerning specific methods and types of flashing installation.
6.) ICE DAM PROTECTION
Eave and rake edge waterproof flashings must be installed per local building codes and where there is a possibility of icing along the eaves and rake edges causing a potential for ice damming and a backup of water. Atlas’s WeatherMaster® products, or equivalent must be applied directly over the decking according to application instructions provided with the product, and local building codes. The waterproof flashing material must extend up the roof at least 24” beyond the interior warm wall line, and in areas of severe icing, at least up to the highest water level expected to occur from ice dams. If the overhang requires flashing wider than 36”, the horizontal lap must be located on the overhang area and cemented or sealed. End laps must be 12” (minimum) and cemented/sealed. WeatherMaster® products, as supplied by Atlas, are recommended as the first layer of Ice Dam Protection. WeatherMaster® products conform to ASTM D 1970.
7.) VALLEYS
Valleys must be installed before StormMaster® Shake shingles are applied.
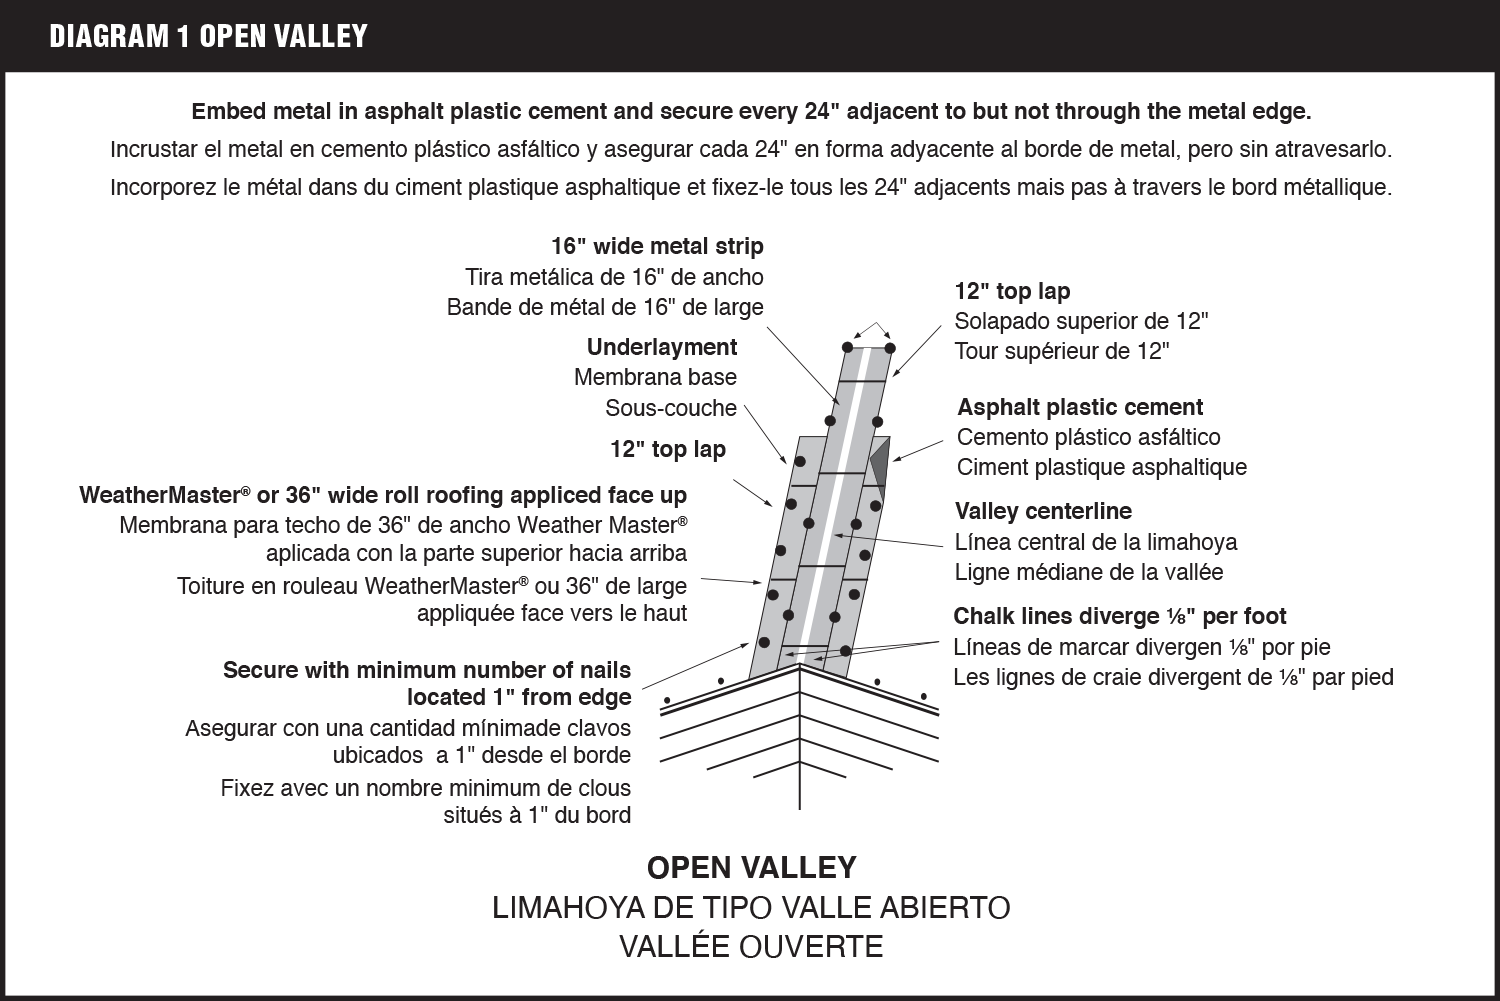
Open Valley: Apply a 36” ice & water product centered in the valley. Install 16” wide minimum copper flashing (or equivalent) also centered in valley. Secure the copper flashing every 24” along both edges either with copper cleats or large head copper nails with the shanks immediately adjacent to the copper edge. Overlaps in the copper must be a minimum of 12”.
Strike chalk lines on each side of the copper valley 3” from the center line. As shingles are applied, trim them to chalk lines and, to direct water into valley, cut 2” diagonally off upper corner of shingles adjacent to chalk line. Set valley edge of each shingle in a 3” wide band of asphalt plastic cement meeting ASTM D 4586 and nail no closer than 6” from valley center line. See Diagram #5.

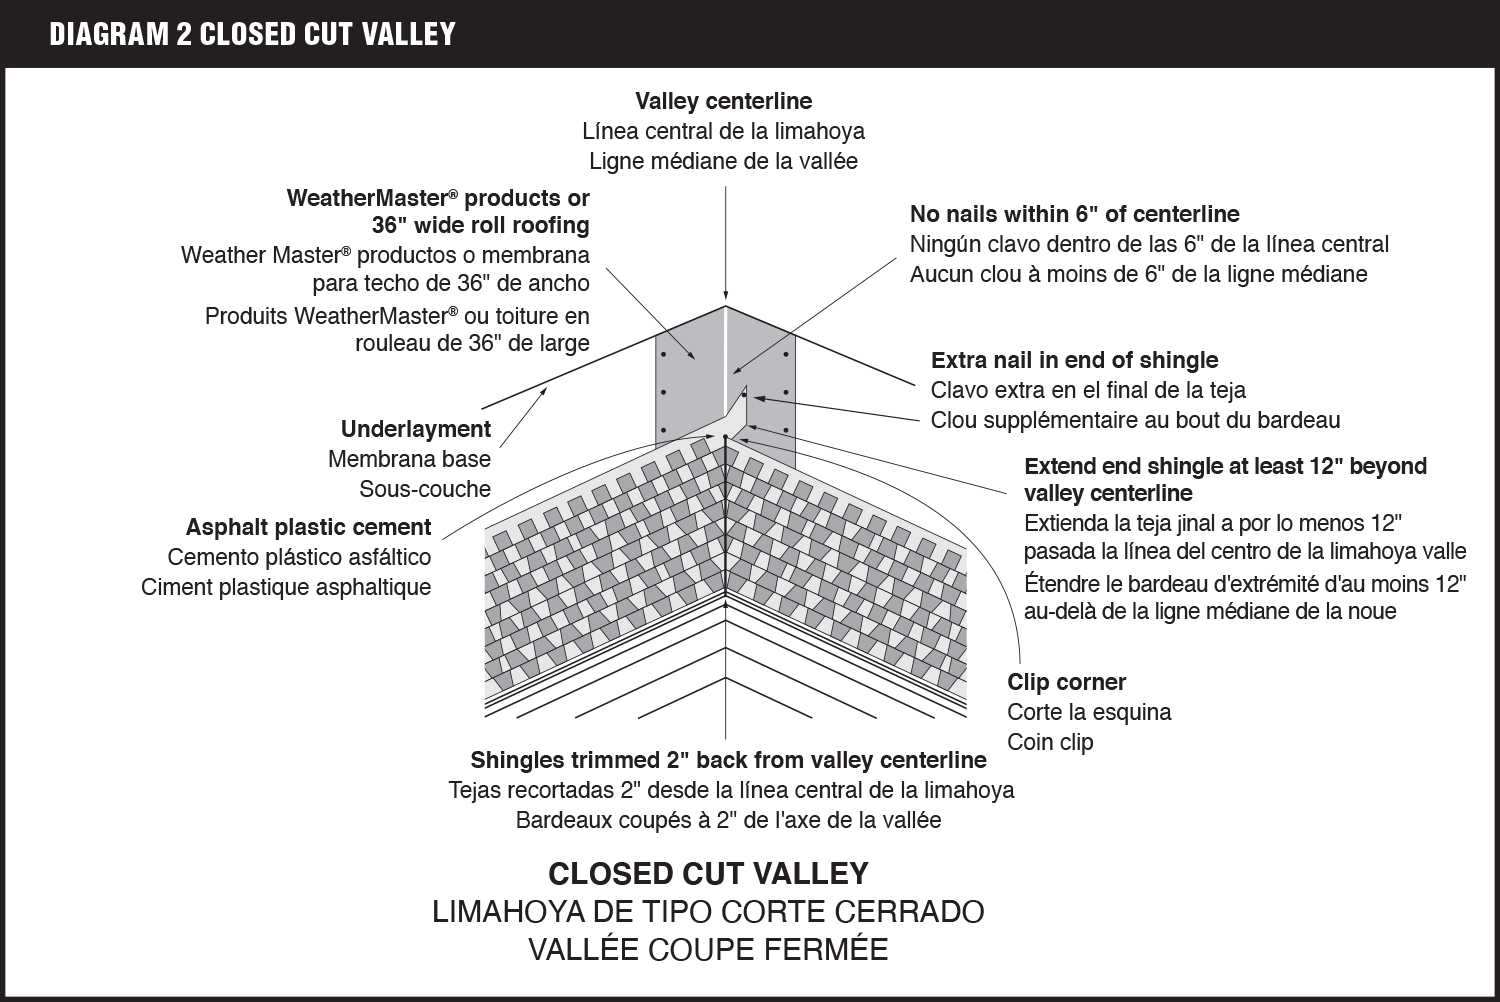
Closed Cut Valley: Apply a 36” wide ice & water product centered in the valley, nailing 2” from outer edges only. Apply all shingles on one side of valley and across center of valley, a minimum of 12”. Nail a minimum of 6” away from the center line of the valley on the unshingled side and strike a chalk line 2” from the center line on the un‐shingled side. Apply shingles on the unshingled side up to the chalk line and trim. Do not cut the underlying shingle.
Cut upper corners of the shingle, cement and nail. See Diagram #4.

8.) FASTENING|t
Placement of nails is critical to overall performance. High nail placement can result in separation of components and will cause delamination of the shingles after application. All nails must be driven straight with the heads flush to the shingle surface, never cutting into the shingle. Nails must not be exposed (visible) on the finished roof. Delamination after installation does not justify a warranty claim.
FASTENERS: Nails must be 11 OR 12 gauge corrosion-resistant roofing nails with 3/8” minimum head. Nails must be long enough to penetrate the roof deck 3/4” or if the deck is less than 3/4” thick, the nails should be long enough to penetrate fully and extend at least 1/8” through the roof deck. Nails may be placed in the sealant line.
NEW ROOFING APPLICATION (first shingle layer): 4 nails are required per shingle. The nails are to be located 7” up from the bottom edge of the shingle, with one nail placed approximately 1” from each side of the shingle, and the remaining two equally spaced between the two outer nails as illustrated in the diagram. NAILS MUST BE MINIMUM OF 1-1/4” LONG. See Diagram #2.

9.) APPLICATION
Prepare deck with an approved roof underlayment, drip edges and flashings as recommended. Horizontal and vertical chalk lines should be utilized to ensure proper shingle alignment from eave to ridge.
Starter Course: Use PRO-CUT® STARTER SHINGLE (Pro-Cut Starter Shingles are REQUIRED for the Signature Select Roofing System) or 3‐tab shingle for the starter course (if your roof is NOT qualifying for the Signature Select Roofing System). Trim off tabs and apply with 1/4” to 3/4” overhang on the eaves. Note the seal‐down feature should be in line with the eave. In order to offset seams, cut 6” off the left end of the first shingle. Begin application at lower left rake of roof, and then continue across with full-length shingle, nailed with 4 nails equally spaced across the shingle and nailed 3” up from the eave. See Diagram #1.

First Course: Begin first full shingle at lower left rake of roof or right of vertical chalk line and continue course across roof with full shingles laid flush with starter course and fastened with 4 nails, placed as specified. Note: an optional band of asphalt plastic cement meeting ASTM D‐4586 may be applied to the rake of the roof with each shingle course to enhance wind resistance and to resist wind driven rain infiltration. See Diagram #3.

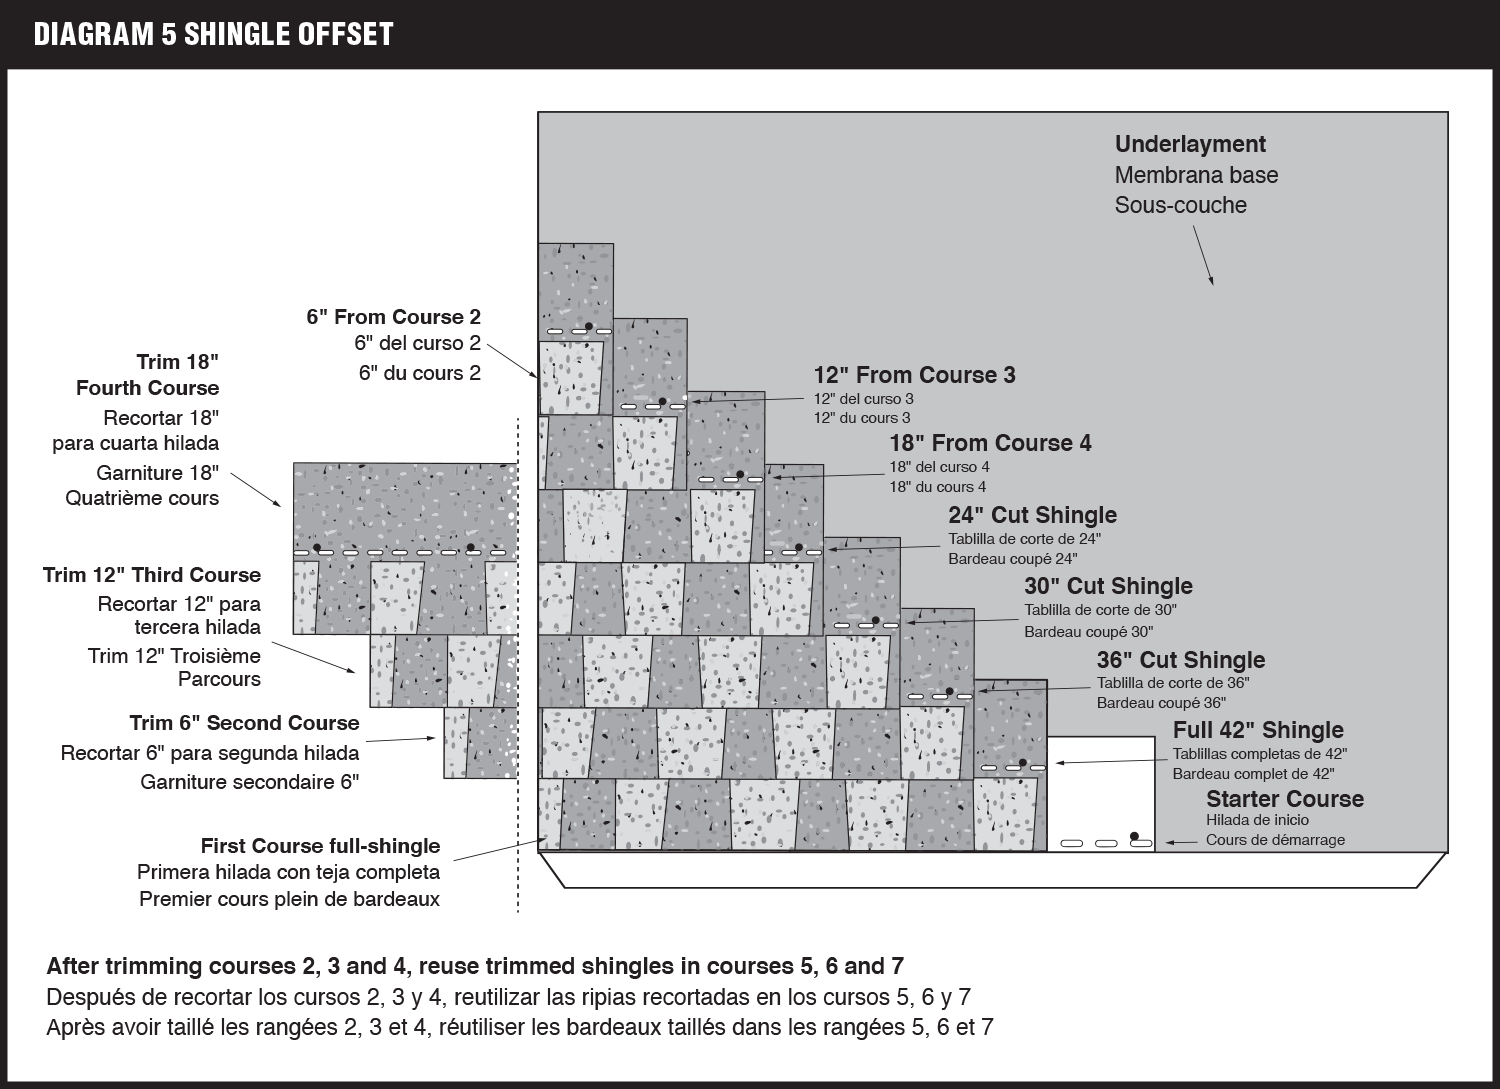
Second Course: Cut 6” off the left end of a shingle and apply the remaining larger piece over the first course shingle, flush with the left edge and exposing the first course 6”. Proceed with full shingle across roof maintaining 6” exposure. Save the 6” piece for starting course 7. See Diagram #3.
Third Course: Cut 12” off the left edge of a shingle and apply the remaining larger piece over the second course shingle, flush with the left edge and exposing the second course 6”. Proceed with full shingle across roof maintaining 6” exposure. Save the 12” piece for starting course 6. See Diagram #3.
Fourth Course: Cut 18” off the left edge of a shingle and apply the remaining larger piece over the third course shingle, flush with the left edge and exposing the third course 6”. Proceed with full shingle across roof maintaining 6” exposure. Save the 18” piece for starting course 5. See Diagram #3.
Fifth Course: Apply the 18” piece that was cut starting the proceeded (4th course) or cut 24” off the left edge of a shingle and apply the remaining 18” piece over the fourth course, flush with the left edge and exposing the fourth course 6”. Proceed with full shingle across roof maintaining 6” exposure. See Diagram #3.
Sixth Course: Apply the 12” piece that was cut starting the 3rd course or cut 30” off the left edge of a shingle and apply the remaining 12” piece over the fifth course, flush with the left edge and exposing the fifth course 6”. Proceed with full shingle across roof maintaining 6” exposure. See Diagram #3.
Seventh Course: Apply the 6” piece that was cut starting the 2nd course or cut 36” off the left edge of a shingle and apply the remaining 6” piece over the sixth course, flush with the left edge and exposing the sixth course 6”. Proceed with full shingle across roof maintaining 6” exposure. See Diagram #3.
Course Completion: Begin eighth course application cycle, with full shingle (same as First Course method) and continue with full shingle across roof. Continuation of this staggered course cycle must be followed to achieve correct pattern appearance.
10.) STEEP SLOPE AND MANSARD APPLICATIONS
Immediately upon application to slopes exceeding 60® (or 21:12), apply six (6) quarter size spots of asphalt plastic cement under each shingle. All six spots are to be approximately 1” up from the bottom edge of the shingle and spaced equally across the shingle with the two outer spots located 1” in from each outer edge. The cement should not be exposed when shingles are pressed into position. Excessive use of roofing cement can cause shingles to blister.
CAUTION: STEEP SLOPE AND MANSARD APPLICATIONS BOTH REQUIRE 6 NAILS EVENLY SPACED ALONG THE LENGTH OF EACH SHINGLE.
11.) HIP AND RIDGE
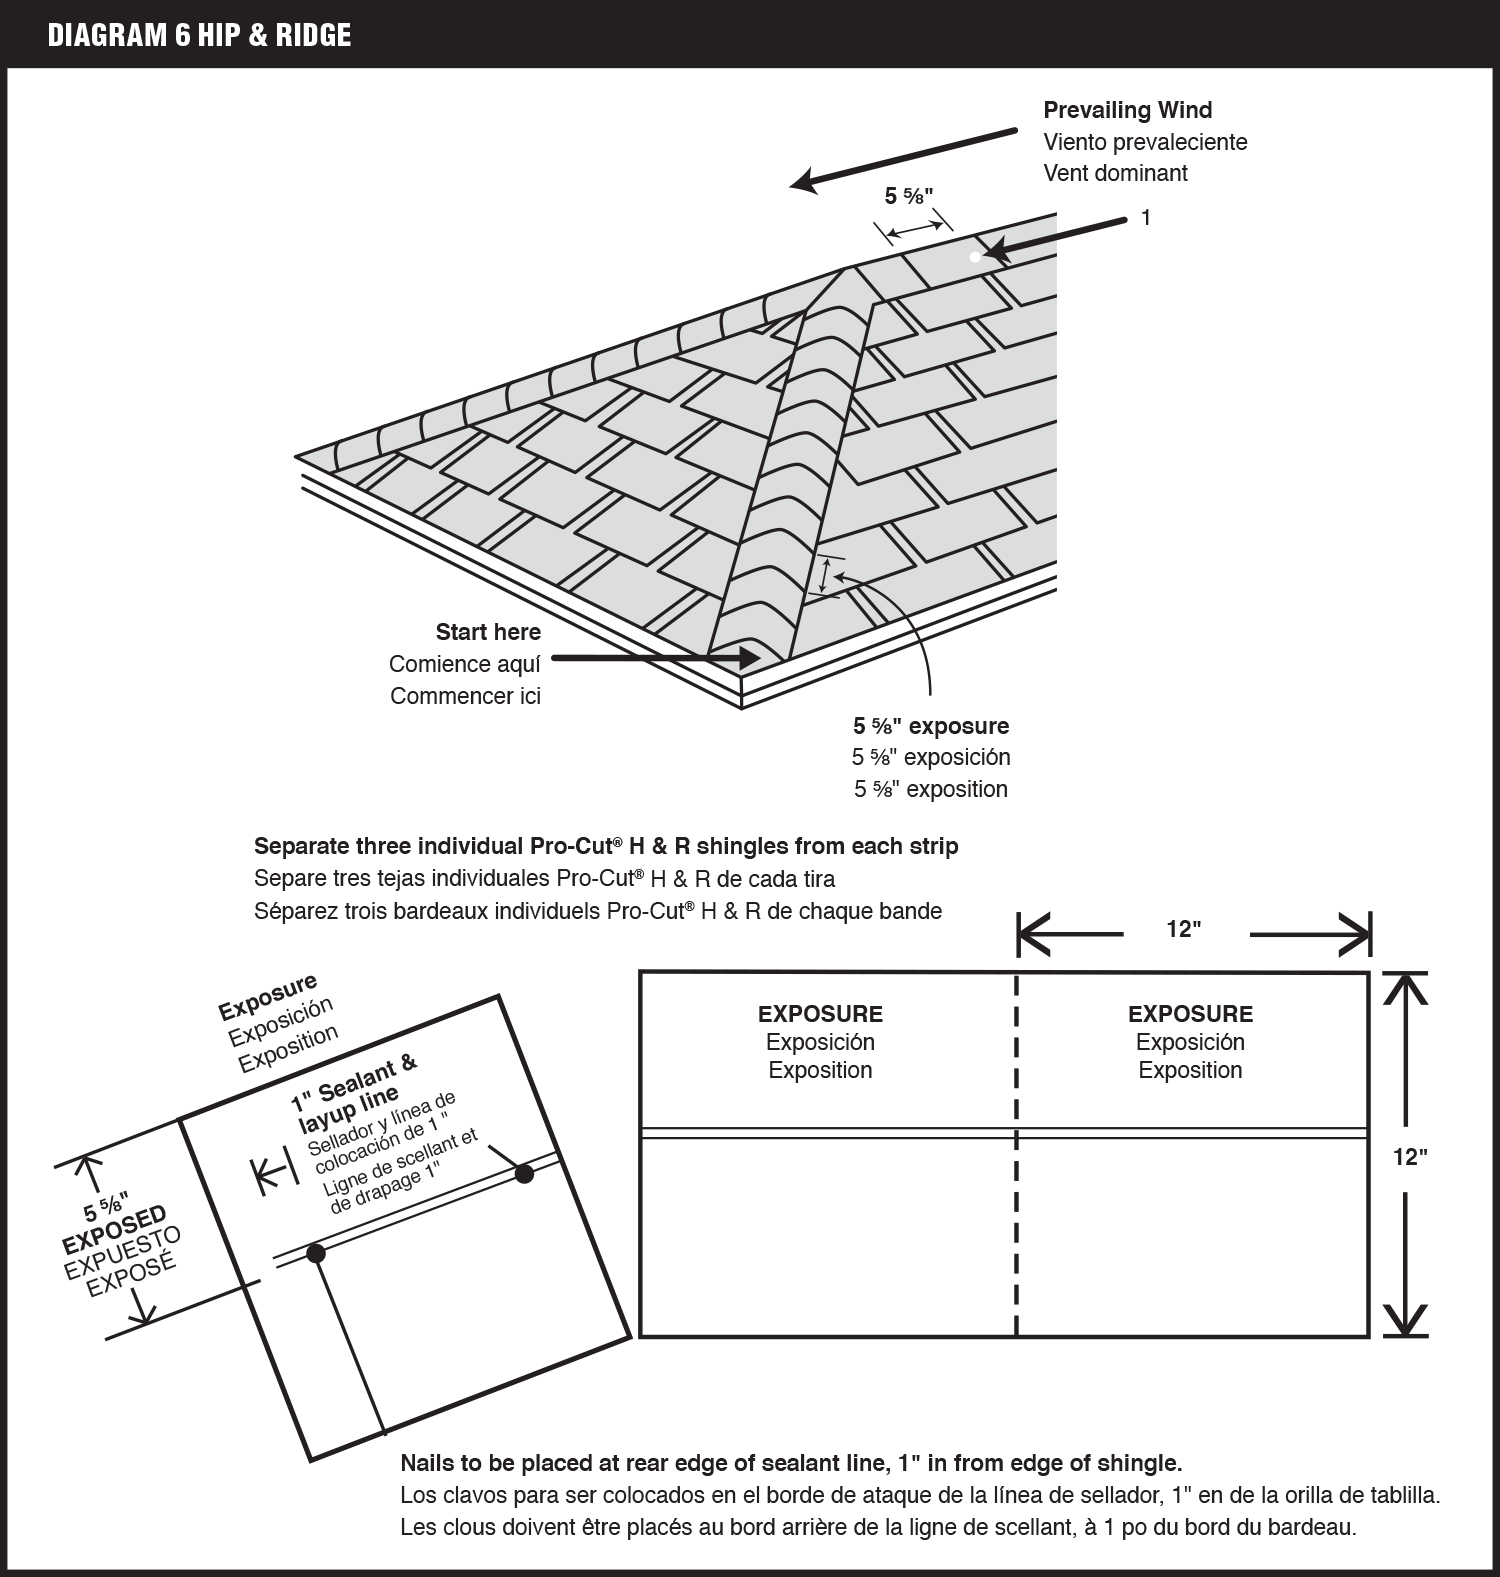
Use Atlas Pro-Cut® Hip & Ridge or Atlas Pro-Cut® High Profile Hip & Ridge (NOTE: Atlas Pro-Cut® Hip & Ridge featuring Scotchgard™ or Atlas Pro-Cut™ High Profile Hip & Ridge featuring Scotchgard™ must be used as hip and ridge for the roof to qualify for Scotchgard™ Limited Warranty Coverage.) To prevent cracking in cold climates when applying to hips and ridges, shingles must be sufficiently warm and flexible. Apply Atlas Pro-Cut® Hip & Ridge shingles with a 5 5/8” exposure, beginning at the bottom of the hip or from the end of the ridge in the direction opposite of prevailing winds. Use two nails per shingle, as specified under Section 8 — Fastening, with one nail on each side, 6” back from the exposed end and 1” up from the edge so succeeding shingles conceal nail heads. Trim final shingle to fit and set in plastic cement. See Diagram #6. When installing ridge vents follow vent manufacturer’s instructions.

Separate the Pro-Cut® Hip & Ridge shingle into three equal pieces along the perforated lines provided. Bend each piece lengthwise to provide equal exposure on both sides of the ridge. Allow 5 5/8” of exposure and nail 6” from exposed butt edge with 2 nails— 1” from each side. The direction of the exposed end should be away from the prevailing wind. One bundle of shingles will provide approximately 31 lineal feet of ridge coverage when applied in accordance with these instructions.
12.) RE-ROOFING OVER ASPHALT SHINGLES
Replace all missing shingles. Split and securely nail all buckles, raised tabs or curled shingles. Ensure attic ventilation complies with FHA Minimum Property Standards as stated previously. Install a layer of number 30 felt underlayment to maintain a Class A fire rating. Asphalt Felt is to be applied over the old shingles and then proceed with the new shingles as if applying a new roof.
DIAGRAM 6 IMPORTANT: Atlas recommends 2” nails for a roof over. See Section 8.
MINIMUM STANDARD SLOPE REQUIREMENT AND INSTRUCTIONS APPLY TO NOT LESS THAN 4 INCHES PER FOOT. LOW SLOPE REQUIREMENT AND INSTRUCTIONS APPLY TO NOT LESS THAN 2 INCHES PER FOOT.
WARNINGS & PRECAUTIONSWARNING:
Roofing application can be dangerous. All necessary precautions and safety guidelines should be observed in accordance with proper roofing trade practices. Every effort should be made to keep roof traffic to a minimum. Regular roof maintenance should be performed in the cooler parts of the day.
Important Precautions: Store on flat surface. Protect from weather during storage and on job site. Sealant protection tape is placed on the back of each shingle and does not have to be removed before applying.
PINNACLE® PRISTINE GENERAL INSTRUCTIONS
1.) GENERAL INSTRUCTIONS
The lifetime limited warranty option is only available for individual single‐family site built detached residence. A 50 year limited warranty would apply to all property owned by government agencies, corporations, limited liability companies, partnerships, trusts, religious organizations, schools, or school districts, condominiums, or cooperative housing arrangements, or installed on apartment buildings or any type of building or premises not used by individual homeowners for a single family site built detached residence.
These shingles are warranted against manufacturing defects and wind gusts up to 130 MPH WITH STANDARD 4 NAIL INSTALLATION ONLY FOR SHINGLES WITH THE “BUILT WITH HP42 TECHNOLOGY DESIGNATION”.
The Pinnacle® Pristine Limited Warranty can be obtained by visiting www.AtlasRoofing.com/Warranty, or by writing to: Atlas Roofing Corporation, Attn: Consumer Services Department, 802 Hwy 19 N., Suite 170, Meridian, Mississippi, 39307. The following instructions must be followed to qualify for protection under the Pinnacle® Pristine Limited Warranty.
Important: See special instructions below for Low Slope Applications. See special instructions below for Steep Slope/Mansard/ 6‐Nail application. To obtain stated area coverage and to achieve design performance and appearance, the directions on this package must be followed. Sealing of the adhesive strips on each shingle to the shingle beneath is created by heat from sunlight. Atlas Roofing Corporation also endorses the Asphalt Roofing Manufacturers Association’s (ARMA) recommendations for application details not specified within this text.
2.) ROOF DECK VENTILATION
Adequate ventilation under the roof deck must be provided to prevent harmful condensation in winter and heat build‐up in summer. These conditions can cause: A. Accelerated shingle weathering B. Deck rot and attic fungus C. Shingle distortion/ cracking due to deck movement D. Cosmetic blisters on the shingle surface. Atlas will not be responsible for damage to shingles as a result of inadequate ventilation. Ventilation provisions must meet or exceed current FHA Minimum Property Standards and conform to all building codes and regulations. To best ensure adequate ventilation and circulation of air, a combination of vents at the ridge and eaves should be used. All roof structures, especially mansard and cathedral type ceilings, must have complete through ventilation from eave area to the ridge area. FHA Minimum Property Standards require 1 square foot of net free attic vent area for every 150 square feet of attic floor area; or one square foot per every 300 square feet, if vapor barrier is installed on the warm side of the ceiling, or at least one half the ventilation area is provided near the ridge.
3.) ROOF DECK
These instructions are for the application of Atlas asphalt shingles to nominal 3/8” or 7/16” thick American Plywood Association (APA/TECO) rated, code approved plywood, OSB decks or minimum ¾” actual thickness, wood decking . The plywood or non-veneer (OSB) decks must comply with the roof deck specifications of APA/TECO. Solid wood decking must be well seasoned, not over 6” (nominal) width, and fastened securely to each rafter. The deck surface must be clean, bare, gap free and flat. Pinnacle® Pristine shingles must not be applied to any surface other than roof deck types described here. Atlas also honors its Shingle Limited Warranty when Atlas shingles are installed on the Atlas CrossVent® Nailable Insulation panels. Atlas will not be responsible for the performance of its shingles if applied directly to non-vented, insulated decks composed of perlite board, plastic foam, fiberboard, gypsum plank, lightweight concrete, cementitious wood fiber, or similar materials or to any decks with insulation installed directly to the underside of the decking, with the exception of CrossVent® Nailable Insulation. Spray foam insulation applied directly to the bottom of the decking will void the warranty. Atlas shingles may be installed over a roof system containing a radiant barrier material if: 1. the required full, flow through ventilation is maintained directly under the decking material in all cases, 2. the radiant barrier material is highly vapor permeable ( > 2 perms), and, 3. the radiant barrier is installed on the underside of or below the decking — not used as an underlayment above the decking. Spray-on types of below deck vapor permeable radiant barriers will be considered only on a job by job basis, and only if tests confirm > 2 perms or greater vapor permeability.
4.) UNDERLAYMENT
Atlas highly recommends the use of high performance, ASTM 6757 compliant - Gorilla Guard® Everfelt™ or Summit® proprietary underlayment products for long term roof system performance and WeatherMaster® products self-adhering, waterproofing underlayment for critical areas, such as valleys and eaves. Atlas does not approve the use of any self-described, metalized or metal containing category of “Radiant Barrier”, as an asphalt shingle underlayment installed above the deck. Use of these types of radiant barrier would void the shingle warranty. Underlayment must be applied flat and unwrinkled. Building codes vary with geographic areas, and the installation must comply with local building codes or shingle manufacturer’s requirements, whichever is stricter. Shingles should be applied as soon as possible after the application of organic underlayment felt, which is not intended for prolonged exposure. Atlas recommends that the shingles be applied the same day as the felt underlayment application to avoid wetting and wrinkling. If an underlayment is used for prolonged dry-in, Atlas recommends Summit® Synthetic Underlayment as the dry-in underlayment, for up to 6 months exposure.
Standard Slope Application: Proper application requires that a single layer of approved underlayment be applied to decks with slopes 4:12 (> 18.4°) up to 21:12 (<60°) and consistent with all applicable building codes. This approved underlayment is a required roof assembly component to maintain a Class A fire rating of the deck assembly. Install underlayment over the entire deck, parallel to the eaves, overhanging 1/4” to 3/8”, with fasteners placed 2” from the deck edge, 12” O.C. across the lower edge and with 2” overlap parallel to eaves and with 4” min. end lap, parallel to the rake. Underlayment end laps shall be staggered 6 feet apart from the adjacent courses. Corrosion-resistant drip edge should be placed over the underlayment at the rake and beneath the underlayment at the eaves.
Low Slope Application: 2:12 (>9.5°) up to 4:12 (<18.4°) (51mm/305mm) on slopes of 2” to 4” rise per foot, a double layer of approved underlayment over the entire deck surface is required. Atlas WeatherMaster Ice & Water products are highly recommended as the underlayment for low slope roofs to cover the entire deck prior to installing shingles. In low slope applications, slopes between 2:12 and 4:12, it is acceptable to install a single layer of WeatherMaster products either on partial or for entire deck coverage. As an alternative option, a double layer of approved underlayment can be installed over the entire deck surface is required. Starting with a 19” wide strip at eaves and overhanging the eaves 1/4” to 3/8”, cover the first 19” course with a full 36” wide strip. Expose the first course 17” and continue up the deck with 36” wide strips, lapping each course 19” over the preceding course - providing a 17” exposure. End laps for low slopes shall be of at least 12” overlap and staggered 6 feet apart. Install drip edge over the underlayment at the rake and beneath the underlayment at the eaves.
5.) FLASHING
All flashing should be in place before shingles are installed. Cap flashings of sheet metal and base flashings of metal or mineral surfaced roll roofing should be used at vertical surfaces such as chimneys, skylights, vents, walls, etc. All flashings should be sealed with asphalt plastic cement. Consult the Residential Asphalt Roofing Manual published by the Asphalt Roofing Manufacturers Association (ARMA) for details concerning specific methods and types of flashing installation.
6.) ICE DAM PROTECTION
Eave and rake edge waterproof flashings must be installed per local building codes and where there is a possibility of icing along the eaves and rake edges causing a potential for ice damming and a backup of water. Atlas’s WeatherMaster® products, or equivalent must be applied directly over the decking according to application instructions provided with the product, and local building codes. The waterproof flashing material must extend up the roof at least 24” beyond the interior warm wall line, and in areas of severe icing, at least up to the highest water level expected to occur from ice dams. If the overhang requires flashing wider than 36”, the horizontal lap must be located on the overhang area and cemented or sealed. End laps must be 12” (minimum) and cemented/sealed. WeatherMaster® products, as supplied by Atlas, are recommended as the first layer of Ice Dam Protection. WeatherMaster® products conform to ASTM D-1970.
7.) VALLEYS
Valleys must be installed before Pinnacle® Pristine shingles are applied.
Open Valley: Apply a 36” ice & water product centered in the valley. Install 16” wide minimum copper flashing (or equivalent) also centered in valley. Secure the copper flashing every 24” along both edges either with copper cleats or large head copper nails with the shanks immediately adjacent to the copper edge. Overlaps in the copper must be a minimum of 12”.
Strike chalk lines on each side of the copper valley 3” from the center line. As shingles are applied, trim them to chalk lines and, to direct water into valley, cut 2” diagonally off upper corner of shingles adjacent to chalk line. Set valley edge of each shingle in a 3” wide band of asphalt plastic cement meeting ASTM D-4586 and nail no closer than 6” from valley center line. See Diagram #5.

Closed Cut Valley: Apply a 36” wide ice & water product centered in the valley, nailing 2” from outer edges only. Apply all shingles on one side of valley and across center of valley, a minimum of 12”. Nail a minimum of 6” away from the center line of the valley on the unshingled side and strike a chalk line 2” from the center line on the un-shingled side. Apply shingles on the unshingled side up to the chalk line and trim. Do not cut the underlying shingle.
Cut upper corners of the shingle, cement and nail. See Diagram #4.

8.) FASTENING
Placement of nails is critical to overall performance. High nail placement can result in separation of components and will cause delamination of the shingles after application. All nails must be driven straight with the heads flush to the shingle surface, never cutting into the shingle. Nails must not be exposed (visible) on the finished roof. Delamination after installation does not justify a warranty claim.
FASTENERS: Nails must be 11 OR 12 gauge corrosion-resistant roofing nails with 3/8” minimum head. Nails must be long enough to penetrate the roof deck 3/4” or if the deck is less than 3/4” thick, the nails should be long enough to penetrate fully and extend at least 1/8” through the roof deck. Nails may be placed in the sealant line.
NEW ROOFING APPLICATION (first shingle layer): 4 nails are required per shingle. The nails are to be located 7” up from the bottom edge of the shingle, with one nail placed approximately 1” from each side of the shingle, and the remaining two equally spaced between the two outer nails as illustrated in the diagram. NAILS MUST BE MINIMUM OF 1-1/4” LONG. See Diagram #2.

RE-ROOFING APPLICATION (second shingle layer): Requires the same nail placement as New Roofing. NAIL PLACEMENT IS IMPORTANT FOR WIND RESISTANCE. INCORRECTLY PLACED NAILS WILL VOID WIND COVERAGE OF WARRANTY. (See Section #12)
9.) APPLICATION
Prepare deck with an approved roof underlayment, drip edges and flashings as recommended. Horizontal and vertical chalk lines should be utilized to ensure proper shingle alignment from eave to ridge.
Starter Course: Use PRO-CUT® STARTER SHINGLE (Pro-Cut Starter Shingles are REQUIRED for the Signature Select Roofing System) or 3‐tab shingle for the starter course (if your roof is NOT qualifying for the Signature Select Roofing System). Trim off tabs and apply with 1/4” to 3/4” overhang on the eaves. Note the seal‐down feature should be in line with the eave. In order to offset seams, cut 6” off the left end of the first shingle. Begin application at lower left rake of roof, and then continue across with full-length shingle, nailed with 4 nails equally spaced across the shingle and nailed 3” up from the eave. See Diagram #1.

First Course: Begin first full shingle at lower left rake of roof or right of vertical chalk line and continue course across roof with full shingles laid flush with starter course and fastened with 4 nails, placed as specified. Note: an optional band of asphalt plastic cement meeting ASTM D‐4586 may be applied to the rake of the roof with each shingle course to enhance wind resistance and to resist wind driven rain infiltration. See Diagram #3.

Second Course: Cut 6” off the left end of a shingle and apply the remaining larger piece over the first course shingle, flush with the left edge and exposing the first course 6”. Proceed with full shingle across roof maintaining 6” exposure. Save the 6” piece for starting course 7. See Diagram #3.
Third Course: Cut 12” off the left edge of a shingle and apply the remaining larger piece over the second course shingle, flush with the left edge and exposing the second course 6”. Proceed with full shingle across roof maintaining 6” exposure. Save the 12” piece for starting course 6. See Diagram #3.
Fourth Course: Cut 18” off the left edge of a shingle and apply the remaining larger piece over the third course shingle, flush with the left edge and exposing the third course 6”. Proceed with full shingle across roof maintaining 6” exposure. Save the 18” piece for starting course 5. See Diagram #3.
Fifth Course: Apply the 18” piece that was cut starting the proceeded (4th course) or cut 24” off the left edge of a shingle and apply the remaining 18” piece over the fourth course, flush with the left edge and exposing the fourth course 6”. Proceed with full shingle across roof maintaining 6” exposure. See Diagram #3.
Sixth Course: Apply the 12” piece that was cut starting the 3rd course or cut 30” off the left edge of a shingle and apply the remaining 12” piece over the fifth course, flush with the left edge and exposing the fifth course 6”. Proceed with full shingle across roof maintaining 6” exposure. See Diagram #3.
Seventh Course: Apply the 6” piece that was cut starting the 2nd course or cut 36” off the left edge of a shingle and apply the remaining 6” piece over the sixth course, flush with the left edge and exposing the sixth course 6”. Proceed with full shingle across roof maintaining 6” exposure. See Diagram #3.
Course Completion: Begin eighth course application cycle, with full shingle (same as First Course method) and continue with full shingle across roof. Continuation of this staggered course cycle must be followed to achieve correct pattern appearance.
10.) STEEP SLOPE AND MANSARD APPLICATIONS
Immediately upon application to slopes exceeding 60° (or 21:12), apply six (6) quarter size spots of asphalt plastic cement under each shingle. All six spots are to be approximately 1” up from the bottom edge of the shingle and spaced equally across the shingle with the two outer spots located 1” in from each outer edge. The cement should not be exposed when shingles are pressed into position. Excessive use of roofing cement can cause shingles to blister.
CAUTION: STEEP SLOPE AND MANSARD APPLICATIONS BOTH REQUIRE 6 NAILS EVENLY SPACED ALONG THE LENGTH OF EACH SHINGLE.
11.) HIP AND RIDGE
(NOTE: Atlas Pro-Cut® Hip & Ridge featuring Scotchgard™ or Atlas Pro-Cut® High Profile Hip & Ridge featuring Scotchgard™ must be used as hip and ridge for the roof to qualify for Scotchgard™ Limited Warranty Coverage.) To prevent cracking in cold climates when applying to hips and ridges, shingles must be sufficiently warm and flexible. Apply Atlas Pro-Cut® Hip & Ridge shingles with a 5 5/8” exposure, beginning at the bottom of the hip or from the end of the ridge in the direction opposite of prevailing winds. Use two nails per shingle, as specified under Section 8 — Fastening, with one nail on each side, 6” back from the exposed end and 1” up from the edge so succeeding shingles conceal nail heads. Trim final shingle to fit and set in plastic cement. See Diagram #6. When installing ridge vents follow vent manufacturer’s instructions.

Separate the Pro-Cut® Hip & Ridge shingle into three equal pieces along the perforated lines provided. Bend each piece lengthwise to provide equal exposure on both sides of the ridge. Allow 5 5/8” of exposure and nail 6” from exposed butt edge with 2 nails—1” from each side. The direction of the exposed end should be away from the prevailing wind. One bundle of shingles will provide approximately 31 lineal feet of ridge coverage when applied in accordance with these instructions.
12.) RE-ROOFING OVER ASPHALT SHINGLES
Replace all missing shingles. Split and securely nail all buckles, raised tabs or curled shingles. Ensure attic ventilation complies with FHA Minimum Property Standards as stated previously. Install a layer of number 30 felt underlayment to maintain a Class A fire rating. Asphalt Felt is to be applied over the old shingles and then proceed with the new shingles as if applying a new roof.
DIAGRAM 6 IMPORTANT: Atlas recommends 2” nails for a roof over. See Section 8.
ATLAS ROOFING CORPORATION DOES NOT APPROVE RE‐ROOFING OVER EXISTING WOOD SHINGLES OR LAMINATED ASPHALT SHINGLES.
MINIMUM STANDARD SLOPE REQUIREMENT AND INSTRUCTIONS APPLY TO NOT LESS THAN 4 INCHES PER FOOT. LOW SLOPE REQUIREMENT AND INSTRUCTIONS APPLY TO NOT LESS THAN 2 INCHES PER FOOT.
WARNINGS & PRECAUTIONS
WARNING: Roofing application can be dangerous. All necessary precautions and safety guidelines should be observed in accordance with proper roofing trade practices. Every effort should be made to keep roof traffic to a minimum. Regular roof maintenance should be performed in the cooler parts of the day.
Important Precautions: Store on flat surface. Protect from weather during storage and on job site. Sealant protection tape is placed on the back of each shingle and does not have to be removed before applying.
DISCOLORATION: Some shading or variations in the colors may occur due to positioning or embedment of the granule. When asphalt shingles are packaged, they are under a certain amount of pressure due to weight. Minor staining may occur. While in storage, they may also pick up varying amounts of backing material used to keep the shingles from sticking together. These discolorations are temporary and are removed by natural weathering.
PROLAM™ GENERAL INSTRUCTIONS
1.) GENERAL INSTRUCTIONS
The lifetime limited warranty option is only available for individual single-family site built detached residence. A 50 year limited warranty would apply to all property owned by government agencies, corporations, limited liability companies, partnerships, trusts, religious organizations, schools, or school districts, condominiums, or cooperative housing arrangements, or installed on apartment buildings or any type of building or premises not used by individual homeowners for a single family site built detached residence.
These shingles are warranted against manufacturing defects and wind gusts up to 110 MPH WITH STANDARD 4 NAIL INSTALLATION. SEE ATLAS LIMITED WARRANTY FOR HIGH WIND WARRANTY PROVISIONS (130 MPH) See Diagram 3 - NAIL APPLICATION.
The ProLam™ Limited Warranty can be obtained by visiting www.AtlasRoofing.com/Warranty, or by writing to: Atlas Roofing Corporation, Attn: Consumer Services Department, 802 Hwy 19 N., Suite 170, Meridian, Mississippi, 39307. The following instructions must be followed to qualify for protection under the ProLam™ Limited Warranty.
Important: See special instructions below for Low Slope Applications. See special instructions below for Steep Slope/Mansard/ 6-Nail application. To obtain stated area coverage and to achieve design performance and appearance, the directions on this package must be followed. Sealing of the adhesive strips on each shingle to the shingle beneath is created by heat from sunlight. Atlas Roofing Corporation also endorses the Asphalt Roofing Manufacturers Association’s (ARMA) recommendations for application details not specified within this text.
2.) ROOF DECK VENTILATION
Adequate ventilation under the roof deck must be provided to prevent harmful condensation in winter and heat build-up in summer. These conditions can cause: A. Accelerated shingle weathering B. Deck rot and attic fungus C. Shingle distortion/ cracking due to deck movement D. Cosmetic blisters on the shingle surface. Atlas will not be responsible for damage to shingles as a result of inadequate ventilation. Ventilation provisions must meet or exceed current FHA Minimum Property Standards and conform to all building codes and regulations. To best ensure adequate ventilation and circulation of air, a combination of vents at the ridge and eaves should be used. All roof structures, especially mansard and cathedral type ceilings, must have complete through ventilation from eave area to the ridge area. FHA Minimum Property Standards require 1 square foot of net free attic vent area for every 150 square feet of attic floor area; or one square foot per every 300 square feet, if vapor barrier is installed on the warm side of the ceiling, or at least one half the ventilation area is provided near the ridge.
3.) ROOF DECK
These instructions are for the application of Atlas asphalt shingles to nominal 3/8” or 7/16” thick American Plywood Association (APA/TECO) rated, code approved plywood, OSB decks or minimum ." actual thickness, wood decking. The plywood or non-veneer (OSB) decks must comply with the roof deck specifications of APA/TECO. Solid wood decking must be well seasoned, not over 6" (nominal) width, and fastened securely to each rafter. The deck surface must be clean, bare, gap free and flat. ProLam™ shingles must not be applied to any surface other than roof deck types described here. Atlas also honors its Shingle Limited Warranty when Atlas shingles are installed on the Atlas CrossVent. Nailable Insulation panels. Atlas will not be responsible for the performance of its shingles if applied directly to non-vented, insulated decks composed of perlite board, plastic foam, fiberboard, gypsum plank, lightweight concrete, cementitious wood fiber, or similar materials or to any decks with insulation installed directly to the underside of the decking, with the exception of CrossVent. Nailable Insulation. Spray foam insulation applied directly to the bottom of the decking will void the warranty. Atlas shingles may be installed over a roof system containing a radiant barrier material if: 1. the required full, flow through ventilation is maintained directly under the decking material in all cases, 2. the radiant barrier material is highly vapor permeable ( > 2 perms), and, 3. the radiant barrier is installed on the underside of or below the decking — not used as an underlayment above the decking. Spray-on types of below deck vapor permeable radiant barriers will be considered only on a job by job basis, and only if tests confirm > 2 perms or greater vapor permeability.
4.) UNDERLAYMENT
Atlas highly recommends the use of high performance, ASTM 6757 compliant - Gorilla Guard® Everfelt™ or Summit® proprietary underlayment products for long term roof system performance and WeatherMaster® products self-adhering, waterproofing underlayment for critical areas, such as valleys and eaves. Atlas does not approve the use of any self-described, metalized or metal containing category of “Radiant Barrier”, as an asphalt shingle underlayment installed above the deck. Use of these types of radiant barrier would void the shingle warranty. Underlayment must be applied flat and unwrinkled. Building codes vary with geographic areas, and the installation must comply with local building codes or shingle manufacturer’s requirements, whichever is stricter. Shingles should be applied as soon as possible after the application of organic underlayment felt, which is not intended for prolonged exposure. Atlas recommends that the shingles be applied the same day as the felt underlayment application to avoid wetting and wrinkling. If an underlayment is used for prolonged dry-in, Atlas recommends Summit® Synthetic Underlayment as the dry-in underlayment, for up to 6 months exposure.
Standard Slope Application: Proper application requires that a single layer of approved underlayment be applied to decks with slopes 4:12 (> 18.4°) up to 21:12 (<60°) and consistent with all applicable building codes. This approved underlayment is a required roof assembly component to maintain a Class A fire rating of the deck assembly. Install underlayment over the entire deck, parallel to the eaves, overhanging 1/4” to 3/8”, with fasteners placed 2” from the deck edge, 12” O.C. across the lower edge and with 2” overlap parallel to eaves and with 4” min. end lap, parallel to the rake. Underlayment end laps shall be staggered 6 feet apart from the adjacent courses. Corrosion-resistant drip edge should be placed over the underlayment at the rake and beneath the underlayment at the eaves.
Low Slope Application: 2:12 (>9.5°) up to 4:12 (<18.4°) (51mm/305mm) on slopes of 2” to 4” rise per foot, a double layer of approved underlayment over the entire deck surface is required. Atlas WeatherMaster Ice & Water products are highly recommended as the underlayment for low slope roofs to cover the entire deck prior to installing shingles. In low slope applications, slopes between 2:12 and 4:12, it is acceptable to install a single layer of WeatherMaster products either on partial or for entire deck coverage. As an alternative option, a double layer of approved underlayment can be installed over the entire deck surface is required. Starting with a 19” wide strip at eaves and overhanging the eaves 1/4” to 3/8”, cover the first 19” course with a full 36” wide strip. Expose the first course 17” and continue up the deck with 36” wide strips, lapping each course 19” over the preceding course - providing a 17” exposure. End laps for low slopes shall be of at least 12” overlap and staggered 6 feet apart. Install drip edge over the underlayment at the rake and beneath the underlayment at the eaves.
5.) FLASHING
All flashing should be in place before shingles are installed. Cap flashings of sheet metal and base flashings of metal or mineral surfaced roll roofing should be used at vertical surfaces such as chimneys, skylights, vents, walls, etc. All flashings should be sealed with asphalt plastic cement. Consult the Residential Asphalt Roofing Manual published by the Asphalt Roofing Manufacturers Association (ARMA) for details concerning specific methods and types of flashing installation.
6.) ICE DAM PROTECTION
Eave and rake edge waterproof flashings must be installed per local building codes and where there is a possibility of icing along the eaves and rake edges causing a potential for ice damming and a backup of water. Atlas’s WeatherMaster. products, or equivalent must be applied directly over the decking according to application instructions provided with the product, and local building codes. The waterproof flashing material must extend up the roof at least 24" beyond the interior warm wall line, and in areas of severe icing, at least up to the highest water level expected to occur from ice dams. If the overhang requires flashing wider than 36", the horizontal lap must be located on the overhang area and cemented or sealed. End laps must be 12" (minimum) and cemented/sealed. WeatherMaster. products, as supplied by Atlas, are recommended as the first layer of Ice Dam Protection. WeatherMaster. products conform to ASTM D-1970.
7.) VALLEYS
Valleys must be installed before ProLam™ shingles are applied.
Open Valley: Apply a 36" ice & water product centered in the valley. Install 16" wide minimum copper flashing (or equivalent) also centered in valley. Secure the copper flashing every 24" along both edges either with copper cleats or large head copper nails with the shanks immediately adjacent to the copper edge. Overlaps in the copper must be a minimum of 12”.
Strike chalk lines on each side of the copper valley 3" from the center line. As shingles are applied, trim them to chalk lines and, to direct water into valley, cut 2" diagonally off upper corner of shingles adjacent to chalk line. Set valley edge of each shingle in a 3" wide band of asphalt plastic cement meeting ASTM D-4586 and nail no closer than 6" from valley center line. See Diagram #1.

Closed Cut Valley: Apply a 36" wide ice & water product centered in the valley, nailing 2" from outer edges only. Apply all shingles on one side of valley and across center of valley, a minimum of 12". Nail a minimum of 6" away from the center line of the valley on the unshingled side and strike a chalk line 2" from the center line on the un-shingled side. Apply shingles on the unshingled side up to the chalk line and trim. Do not cut the underlying shingle.
Cut upper corners of the shingle, cement and nail. See Diagram #2.
8.) FASTENING
Placement of nails is critical to overall performance. High nail placement can result in separation of components and will cause delamination of the shingles after application. All nails must be driven straight with the heads flush to the shingle surface, never cutting into the shingle. Nails must not be exposed (visible) on the finished roof. Delamination after installation does not justify a warranty claim.
FASTENERS: Nails must be 11 OR 12 gauge corrosion-resistant roofing nails with 3/8" minimum head. Nails must be long enough to penetrate the roof deck 3/4" or if the deck is less than 3/4" thick, the nails should be long enough to penetrate fully and extend at least 1/8" through the roof deck. Nails may be placed in the sealant line.
NEW ROOFING APPLICATION (first shingle layer): 4 nails are required per shingle. The nails are to be located 7" up from the bottom edge of the shingle, with one nail placed approximately 1" from each side of the shingle, and the remaining two equally spaced between the two outer nails as illustrated in the diagram. NAILS MUST BE MINIMUM OF 1-1/4" LONG. See Diagram #3.
RE-ROOFING APPLICATION (second shingle layer): Requires the same nail placement as New Roofing. NAIL PLACEMENT IS IMPORTANT FOR WIND RESISTANCE. INCORRECTLY PLACED NAILS WILL VOID WIND COVERAGE OF WARRANTY. (See Section #12)

9.) APPLICATION
Prepare deck with an approved roof underlayment, drip edges and flashings as recommended. Horizontal and vertical chalk lines should be utilized to ensure proper shingle alignment from eave to ridge.
Starter Course: Use PRO-CUT. STARTER SHINGLE or 3-tab shingle for the starter course. Trim off tabs and apply with 1/4" to 3/4" overhang on the eaves. Note the seal-down feature should be in line with the eave. In order to offset seams, cut 6" off the left end of the first shingle. Begin application at lower left rake of roof, and then continue across with full-length shingle, nailed with 4 nails equally spaced across the shingle and nailed 3” up from the eave. See Diagram #4.

Note: Existing product manufactured with a 39 3/8” width (specified for installation at a 5” offset) can be installed with the new 42” width size format (specified for installation at a 6” offset) as long as you follow the “when mixing product” instructions.
WHEN MIXING PRODUCT: Always ensure the overlap between shingles is never less than 5” by checking and measuring below and above the transition course. Check your seams to ensure it is never less than 5”, then make the appropriate periodic cuts on your transition course.
Note: For maximum material application and color blend efficiencies Atlas recommends a 6” offset pattern. ARMA Best practices manual allows for an installation of not less than 4” and not greater than 8”.
First Course: Begin first full shingle at lower left rake of roof or right of vertical chalk line and continue course across roof with full shingles laid flush with starter course and fastened with 4 nails, placed as specified. Note: an optional band of asphalt plastic cement meeting ASTM D-4586 may be applied to the rake of the roof with each shingle course to enhance wind resistance and to resist wind driven rain infiltration. See Diagram #5.
Second Course: Cut 6” off the left end of a shingle and apply the remaining larger piece over the first course shingle, flush with the left edge and exposing the first course 6". Proceed with full shingle across roof maintaining 6” exposure. Save the 6” piece for starting course 7. See Diagram #5.
Third Course: Cut 12” off the left edge of a shingle and apply the remaining larger piece over the second course shingle, f lush with the left edge and exposing the second course 6". Proceed with full shingle across roof maintaining 6" exposure. Save the 12” piece for starting course 6. See Diagram #5.
Fourth Course: Cut 18” off the left edge of a shingle and apply the remaining larger piece over the third course shingle, flush with the left edge and exposing the third course 6". Proceed with full shingle across roof maintaining 6" exposure. Save the 18” piece for starting course 5. See Diagram #5.
Fifth Course: Apply the 18” piece that was cut starting the proceeded (4th course) or cut 24” off the left edge of a shingle and apply the remaining 18” piece over the fourth course, flush with the left edge and exposing the fourth course 6". Proceed with full shingle across roof maintaining 6" exposure. See Diagram #5.
Sixth Course: Apply the 12” piece that was cut starting the 3rd course or cut 30” off the left edge of a shingle and apply the remaining 12” piece over the fifth course, flush with the left edge and exposing the fifth course 6". Proceed with full shingle across roof maintaining 6" exposure. See Diagram #5.
Seventh Course: Apply the 6” piece that was cut starting the 2nd course or cut 36” off the left edge of a shingle and apply the remaining 6” piece over the sixth course, flush with the left edge and exposing the sixth course 6". Proceed with full shingle across roof maintaining 6" exposure. See Diagram #5.
Course Completion: Begin eighth course application cycle, with full shingle (same as First Course method) and continue with full shingle across roof. Continuation of this staggered course cycle must be followed to achieve correct pattern appearance.
Note: Existing product manufactured with a 39 3/8” width (specified for installation at a 5” offset) can be installed with the new 42” width size format (specified for installation at a 6” offset) as long as you follow the “when mixing product” instructions.
WHEN MIXING PRODUCT: Always ensure the overlap between shingles is never less than 5” by checking and measuring below and above the transition course. Check your seams to ensure it is never less than 5”, then make the appropriate periodic cuts on your transition course.
10.) STEEP SLOPE AND MANSARD APPLICATIONS
Immediately upon application to slopes exceeding 60° (or 21:12), apply six (6) quarter size spots of asphalt plastic cement under each shingle. All six spots are to be approximately 1" up from the bottom edge of the shingle and spaced equally across the shingle with the two outer spots located 1" in from each outer edge. The cement should not be exposed when shingles are pressed into position. Excessive use of roofing cement can cause shingles to blister.
CAUTION: STEEP SLOPE AND MANSARD APPLICATIONS BOTH REQUIRE 6 NAILS EVENLY SPACED ALONG THE LENGTH OF EACH SHINGLE.
11.) HIP AND RIDGE
Use Atlas Pro-Cut Hip & Ridge or Atlas Pro-Cut High Profile Hip & Ridge. To prevent cracking in cold climates when applying to hips and ridges, shingles must be sufficiently warm and flexible. Apply Atlas Pro-Cut. Hip & Ridge shingles with a 5 5/8" exposure, beginning at the bottom of the hip or from the end of the ridge in the direction opposite of prevailing winds. Use two nails per shingle, as specified under Section 8– Fastening, with one nail on each side, 6" back from the exposed end and 1" up from the edge so succeeding shingles conceal nail heads. Trim final shingle to fit and set in plastic cement. See Diagram #6.

When installing ridge vents follow vent manufacturer’s instructions.
Separate the Pro-Cut Hip & Ridge shingle into three equal pieces along the perforated lines provided. Bend each piece lengthwise to provide equal exposure on both sides of the ridge. Allow 5 5/8" of exposure and nail 6” from exposed butt edge with 2 nails— 1" from each side. The direction of the exposed end should be away from the prevailing wind. One bundle of shingles will provide approximately 31 lineal feet of ridge coverage when applied in accordance with these instructions.
12.) RE-ROOFING OVER ASPHALT SHINGLES
Replace all missing shingles. Split and securely nail all buckles, raised tabs or curled shingles. Ensure attic ventilation complies with FHA Minimum Property Standards as stated previously. Install a layer of number 30 felt underlayment to maintain a Class A fire rating. Asphalt Felt is to be applied over the old shingles and then proceed with the new shingles as if applying a new roof.
DIAGRAM 6 IMPORTANT: Atlas recommends 2" nails for a roof over. See Section 8.
ATLAS ROOFING CORPORATION DOES NOT APPROVE RE-ROOFING OVER EXISTING WOOD SHINGLES OR LAMINATED ASPHALT SHINGLES.
MINIMUM STANDARD SLOPE REQUIREMENT AND INSTRUCTIONS APPLY TO NOT LESS THAN 4 INCHES PER FOOT. LOW SLOPE REQUIREMENT AND INSTRUCTIONS APPLY TO NOT LESS THAN 2 INCHES PER FOOT.
WARNINGS & PRECAUTIONS
WARNING: Roofing application can be dangerous. All necessary precautions and safety guidelines should be observed in accordance with proper roofing trade practices. Every effort should be made to keep roof traffic to a minimum. Regular roof maintenance should be performed in the cooler parts of the day.
Important Precautions: Store on flat surface. Protect from weather during storage and on job site. Sealant protection tape is placed on the back of each shingle and does not have to be removed before applying.
DISCOLORATION: Some shading or variations in the colors may occur due to positioning or embedment of the granule. When asphalt shingles are packaged, they are under a certain amount of pressure due to weight. Minor staining may occur. While in storage, they may also pick up varying amounts of backing material used to keep the shingles from sticking together. These discolorations are temporary and are removed by natural weathering.
BRIARWOOD PRO™ GENERAL INSTRUCTIONS
1.) GENERAL INSTRUCTIONS
The lifetime limited warranty option is only available for individual single‐family site built detached residence. A 50 year limited warranty would apply to all property owned by government agencies, corporations, limited liability companies, partnerships, trusts, religious organizations, schools, or school districts, condominiums, or cooperative housing arrangements, or installed on apartment buildings or any type of building or premises not used by individual homeowners for a single family site built detached residence.
These shingles are warranted against manufacturing defects and wind gusts up to 130 MPH WITH STANDARD 4 NAIL INSTALLATION ONLY FOR SHINGLES WITH THE “BUILT WITH HP42 TECHNOLOGY DESIGNATION”.
The Briarwood Pro™ Limited Warranty can be obtained by visiting www.AtlasRoofing.com/Warranty, or by writing to: Atlas Roofing Corporation, Attn: Consumer Services Department, 802 Hwy 19 N., Suite 170, Meridian, Mississippi, 39307. The following instructions must be followed to qualify for protection under the Briarwood Pro™ Limited Warranty.
Important: See special instructions below for Low Slope Applications. See special instructions below for Steep Slope/Mansard/ 6‐Nail application. To obtain stated area coverage and to achieve design performance and appearance, the directions on this package must be followed. Sealing of the adhesive strips on each shingle to the shingle beneath is created by heat from sunlight. Atlas Roofing Corporation also endorses the Asphalt Roofing Manufacturers Association’s (ARMA) recommendations for application details not specified within this text.
2.) ROOF DECK VENTILATION
Adequate ventilation under the roof deck must be provided to prevent harmful condensation in winter and heat build‐up in summer. These conditions can cause: A. Accelerated shingle weathering B. Deck rot and attic fungus C. Shingle distortion/ cracking due to deck movement D. Cosmetic blisters on the shingle surface. Atlas will not be responsible for damage to shingles as a result of inadequate ventilation. Ventilation provisions must meet or exceed current FHA Minimum Property Standards and conform to all building codes and regulations. To best ensure adequate ventilation and circulation of air, a combination of vents at the ridge and eaves should be used. All roof structures, especially mansard and cathedral type ceilings, must have complete through ventilation from eave area to the ridge area. FHA Minimum Property Standards require 1 square foot of net free attic vent area for every 150 square feet of attic floor area; or one square foot per every 300 square feet, if vapor barrier is installed on the warm side of the ceiling, or at least one half the ventilation area is provided near the ridge.
3.) ROOF DECK
These instructions are for the application of Atlas asphalt shingles to nominal 3/8” or 7/16” thick American Plywood Association (APA/TECO) rated, code approved plywood, OSB decks or minimum ¾” actual thickness, wood decking . The plywood or non-‐veneer (OSB) decks must comply with the roof deck specifications of APA/TECO. Solid wood decking must be well seasoned, not over 6” (nominal) width, and fastened securely to each rafter. The deck surface must be clean, bare, gap free and flat. Briarwood Pro™ shingles must not be applied to any surface other than roof deck types described here. Atlas also honors its Shingle Limited Warranty when Atlas shingles are installed on the Atlas CrossVent® Nailable Insulation panels. Atlas will not be responsible for the performance of its shingles if applied directly to non‐vented, insulated decks composed of perlite board, plastic foam, fiberboard, gypsum plank, lightweight concrete, cementitious wood fiber, or similar materials or to any decks with insulation installed directly to the underside of the decking, with the exception of CrossVent® Nailable Insulation. Spray foam insulation applied directly to the bottom of the decking will void the warranty. Atlas shingles may be installed over a roof system containing a radiant barrier material if: 1. the required full, flow through ventilation is maintained directly under the decking material in all cases, 2. the radiant barrier material is highly vapor permeable ( > 2 perms), and, 3. the radiant barrier is installed on the underside of or below the decking – not used as an underlayment above the decking. Spray-‐on types of below deck vapor permeable radiant barriers will be considered only on a job by job basis, and only if tests confirm > 2 perms or greater vapor permeability.
4.) UNDERLAYMENT
Atlas highly recommends the use of high performance, ASTM 6757 compliant - Gorilla Guard® Everfelt™ or Summit® proprietary underlayment products for long term roof system performance and WeatherMaster® products self-adhering, waterproofing underlayment for critical areas, such as valleys and eaves. Atlas does not approve the use of any self-described, metalized or metal containing category of “Radiant Barrier”, as an asphalt shingle underlayment installed above the deck. Use of these types of radiant barrier would void the shingle warranty. Underlayment must be applied flat and unwrinkled. Building codes vary with geographic areas, and the installation must comply with local building codes or shingle manufacturer’s requirements, whichever is stricter. Shingles should be applied as soon as possible after the application of organic underlayment felt, which is not intended for prolonged exposure. Atlas recommends that the shingles be applied the same day as the felt underlayment application to avoid wetting and wrinkling. If an underlayment is used for prolonged dry-in, Atlas recommends Summit® Synthetic Underlayment as the dry-in underlayment, for up to 6 months exposure.
Standard Slope Application: Proper application requires that a single layer of approved underlayment be applied to decks with slopes 4:12 (> 18.4°) up to 21:12 (<60°) and consistent with all applicable building codes. This approved underlayment is a required roof assembly component to maintain a Class A fire rating of the deck assembly. Install underlayment over the entire deck, parallel to the eaves, overhanging 1/4” to 3/8”, with fasteners placed 2” from the deck edge, 12” O.C. across the lower edge and with 2” overlap parallel to eaves and with 4” min. end lap, parallel to the rake. Underlayment end laps shall be staggered 6 feet apart from the adjacent courses. Corrosion-resistant drip edge should be placed over the underlayment at the rake and beneath the underlayment at the eaves.
Low Slope Application: 2:12 (>9.5°) up to 4:12 (<18.4°) (51mm/305mm) on slopes of 2” to 4” rise per foot, a double layer of approved underlayment over the entire deck surface is required. Atlas WeatherMaster Ice & Water products are highly recommended as the underlayment for low slope roofs to cover the entire deck prior to installing shingles. In low slope applications, slopes between 2:12 and 4:12, it is acceptable to install a single layer of WeatherMaster products either on partial or for entire deck coverage. As an alternative option, a double layer of approved underlayment can be installed over the entire deck surface is required. Starting with a 19” wide strip at eaves and overhanging the eaves 1/4” to 3/8”, cover the first 19” course with a full 36” wide strip. Expose the first course 17” and continue up the deck with 36” wide strips, lapping each course 19” over the preceding course - providing a 17” exposure. End laps for low slopes shall be of at least 12” overlap and staggered 6 feet apart. Install drip edge over the underlayment at the rake and beneath the underlayment at the eaves.
5.) FLASHING
All flashing should be in place before shingles are installed. Cap flashings of sheet metal and base flashings of metal or mineral surfaced roll roofing should be used at vertical surfaces such as chimneys, skylights, vents, walls, etc. All flashings should be sealed with asphalt plastic cement. Consult the Residential Asphalt Roofing Manual published by the Asphalt Roofing Manufacturers Association (ARMA) for details concerning specific methods and types of flashing installation.
6.) ICE DAM PROTECTION
Eave and rake edge waterproof flashings must be installed per local building codes and where there is a possibility of icing along the eaves and rake edges causing a potential for ice damming and a backup of water. Atlas’s WeatherMaster® products, or equivalent must be applied directly over the decking according to application instructions provided with the product, and local building codes. The waterproof flashing material must extend up the roof at least 24” beyond the interior warm wall line, and in areas of severe icing, at least up to the highest water level expected to occur from ice dams. If the overhang requires flashing wider than 36”, the horizontal lap must be located on the overhang area and cemented or sealed. End laps must be 12” (minimum) and cemented/sealed. WeatherMaster® products, as supplied by Atlas, are recommended as the first layer of Ice Dam Protection. WeatherMaster® products conform to ASTM D-1970.
7.) VALLEYS
Valleys must be installed before Briarwood Pro™ shingles are applied.
Open Valley: Apply a 36” ice & water product centered in the valley. Install 16” wide minimum copper flashing (or equivalent) also centered in valley. Secure the copper flashing every 24” along both edges either with copper cleats or large head copper nails with the shanks immediately adjacent to the copper edge. Overlaps in the copper must be a minimum of 12”.
Strike chalk lines on each side of the copper valley 3” from the center line. As shingles are applied, trim them to chalk lines and, to direct water into valley, cut 2” diagonally off upper corner of shingles adjacent to chalk line. Set valley edge of each shingle in a 3” wide band of asphalt plastic cement meeting ASTM D-4586 and nail no closer than 6” from valley center line. See Diagram #1.
Closed Cut Valley: Apply a 36” wide ice & water product centered in the valley, nailing 2” from outer edges only. Apply all shingles on one side of valley and across center of valley, a minimum of 12”. Nail a minimum of 6” away from the center line of the valley on the unshingled side and strike a chalk line 2” from the center line on the un-shingled side. Apply shingles on the unshingled side up to the chalk line and trim. Do not cut the underlying shingle.
Cut upper corners of the shingle, cement and nail. See Diagram #2.

8.) FASTENING
Placement of nails is critical to overall performance. High nail placement can result in separation of components and will cause delamination of the shingles after application. All nails must be driven straight with the heads flush to the shingle surface, never cutting into the shingle. Nails must not be exposed (visible) on the finished roof. Delamination after installation does not justify a warranty claim.
FASTENERS: Nails must be 11 OR 12 gauge corrosion-resistant roofing nails with 3/8” minimum head. Nails must be long enough to penetrate the roof deck 3/4” or if the deck is less than 3/4” thick, the nails should be long enough to penetrate fully and extend at least 1/8” through the roof deck. Nails may be placed in the sealant line.
NEW ROOFING APPLICATION (first shingle layer): 4 nails are required per shingle. The nails are to be located 7” up from the bottom edge of the shingle, with one nail placed approximately 1” from each side of the shingle, and the remaining two equally spaced between the two outer nails as illustrated in the diagram. NAILS MUST BE MINIMUM OF 1-1/4” LONG. See Diagram #3.
RE-ROOFING APPLICATION (second shingle layer): Requires the same nail placement as New Roofing. NAIL PLACEMENT IS IMPORTANT FOR WIND RESISTANCE. INCORRECTLY PLACED NAILS WILL VOID WIND COVERAGE OF WARRANTY. (See Section #12)

9.) APPLICATION
Prepare deck with an approved roof underlayment, drip edges and flashings as recommended. Horizontal and vertical chalk lines should be utilized to ensure proper shingle alignment from eave to ridge.
Starter Course: Use PRO-CUT® STARTER SHINGLE or 3-tab shingle for the starter course. Trim off tabs and apply with 1/4” to 3/4” overhang on the eaves. Note the seal-down feature should be in line with the eave. In order to offset seams, cut 6” off the left end of the first shingle. Begin application at lower left rake of roof, and then continue across with full-length shingle, nailed with 4 nails equally spaced across the shingle and nailed 3” up from the eave. See Diagram #4.

Note: Existing product manufactured with a 39 3/8” width (specified for installation at a 5” offset) can be installed with the new 42” width size format (specified for installation at a 6” offset) as long as you follow the “when mixing product” instructions.
WHEN MIXING PRODUCT: Always ensure the overlap between shingles is never less than 5” by checking and measuring below and above the transition course. Check your seams to ensure it is never less than 5”, then make the appropriate periodic cuts on your transition course.
Note: For maximum material application and color blend efficiencies Atlas recommends a 6” offset pattern. ARMA Best practices manual allows for an installation of not less than 4” and not greater than 8”.
First Course: Begin first full shingle at lower left rake of roof or right of vertical chalk line and continue course across roof with full shingles laid flush with starter course and fastened with 4 nails, placed as specified. Note: an optional band of asphalt plastic cement meeting ASTM D-4586 may be applied to the rake of the roof with each shingle course to enhance wind resistance and to resist wind driven rain infiltration. See Diagram #5.
Second Course: Cut 6” off the left end of a shingle and apply the remaining larger piece over the first course shingle, flush with the left edge and exposing the first course 6”. Proceed with full shingle across roof maintaining 6” exposure. Save the 6” piece for starting course 7. See Diagram #5.
Third Course: Cut 12” off the left edge of a shingle and apply the remaining larger piece over the second course shingle, flush with the left edge and exposing the second course 6”. Proceed with full shingle across roof maintaining 6” exposure. Save the 12” piece for starting course 6. See Diagram #5.
Fourth Course: Cut 18” off the left edge of a shingle and apply the remaining larger piece over the third course shingle, flush with the left edge and exposing the third course 6”. Proceed with full shingle across roof maintaining 6” exposure. Save the 18” piece for starting course 5. See Diagram #5.
Fifth Course: Apply the 18” piece that was cut starting the proceeded (4th course) or cut 24” off the left edge of a shingle and apply the remaining 18” piece over the fourth course, flush with the left edge and exposing the fourth course 6”. Proceed with full shingle across roof maintaining 6” exposure. See Diagram #5.
Sixth Course: Apply the 12” piece that was cut starting the 3rd course or cut 30” off the left edge of a shingle and apply the remaining 12” piece over the fifth course, flush with the left edge and exposing the fifth course 6”. Proceed with full shingle across roof maintaining 6” exposure. See Diagram #5.
Seventh Course: Apply the 6” piece that was cut starting the 2nd course or cut 36” off the left edge of a shingle and apply the remaining 6” piece over the sixth course, flush with the left edge and exposing the sixth course 6”. Proceed with full shingle across roof maintaining 6” exposure. See Diagram #5.

Course Completion: Begin eighth course application cycle, with full shingle (same as First Course method) and continue with full shingle across roof. Continuation of this staggered course cycle must be followed to achieve correct pattern appearance.
Note: Existing product manufactured with a 39 3/8” width (specified for installation at a 5” offset) can be installed with the new 42” width size format (specified for installation at a 6” offset) as long as you follow the “when mixing product” instructions.
WHEN MIXING PRODUCT: Always ensure the overlap between shingles is never less than 5” by checking and measuring below and above the transition course. Check your seams to ensure it is never less than 5”, then make the appropriate periodic cuts on your transition course.
10.) STEEP SLOPE AND MANSARD APPLICATIONS
Immediately upon application to slopes exceeding 60°(or 21:12), apply six (6) quarter size spots of asphalt plastic cement under each shingle. All six spots are to be approximately 1” up from the bottom edge of the shingle and spaced equally across the shingle with the two outer spots located 1” in from each outer edge. The cement should not be exposed when shingles are pressed into position. Excessive use of roofing cement can cause shingles to blister.
CAUTION: STEEP SLOPE AND MANSARD APPLICATIONS BOTH REQUIRE 6 NAILS EVENLY SPACED ALONG THE LENGTH OF EACH SHINGLE.
11.) HIP AND RIDGE
Use Atlas Pro-Cut® Hip & Ridge or Atlas Pro-Cut® High Profile Hip & Ridge. To prevent cracking in cold climates when applying to hips and ridges, shingles must be sufficiently warm and flexible. Apply Atlas Pro-Cut® Hip & Ridge shingles with a 5 5/8” exposure, beginning at the bottom of the hip or from the end of the ridge in the direction opposite of prevailing winds. Use two nails per shingle, as specified under Section 8 — Fastening, with one nail on each side, 6” back from the exposed end and 1” up from the edge so succeeding shingles conceal nail heads. Trim final shingle to fit and set in plastic cement. See Diagram #6. When installing ridge vents follow vent manufacturer’s instructions.
Separate the Pro-Cut® Hip & Ridge shingle into three equal pieces along the perforated lines provided. Bend each piece lengthwise to provide equal exposure on both sides of the ridge. Allow 5 5/8” of exposure and nail 6” from exposed butt edge with 2 nails—1” from each side. The direction of the exposed end should be away from the prevailing wind. One bundle of shingles will provide approximately 31 lineal feet of ridge coverage when applied in accordance with these instructions.
12.) RE-ROOFING OVER ASPHALT SHINGLES
Replace all missing shingles. Split and securely nail all buckles, raised tabs or curled shingles. Ensure attic ventilation complies with FHA Minimum Property Standards as stated previously. Install a layer of number 30 felt underlayment to maintain a Class A fire rating. Asphalt Felt is to be applied over the old shingles and then proceed with the new shingles as if applying a new roof.
ATLAS ROOFING CORPORATION DOES NOT APPROVE RE‐ROOFING OVER EXISTING WOOD SHINGLES OR LAMINATED ASPHALT SHINGLES.
MINIMUM STANDARD SLOPE REQUIREMENT AND INSTRUCTIONS APPLY TO NOT LESS THAN 4 INCHES PER FOOT. LOW SLOPE REQUIREMENT AND INSTRUCTIONS APPLY TO NOT LESS THAN 2 INCHES PER FOOT.
WARNINGS & PRECAUTIONS
WARNING: Roofing application can be dangerous. All necessary precautions and safety guidelines should be observed in accordance with proper roofing trade practices. Every effort should be made to keep roof traffic to a minimum. Regular roof maintenance should be performed in the cooler parts of the day.
Important Precautions: Store on flat surface. Protect from weather during storage and on job site. Sealant protection tape is placed on the back of each shingle and does not have to be removed before applying.
DISCOLORATION: Some shading or variations in the colors may occur due to positioning or embedment of the granule. When asphalt shingles are packaged, they are under a certain amount of pressure due to weight. Minor staining may occur. While in storage, they may also pick up varying amounts of backing material used to keep the shingles from sticking together. These discolorations are temporary and are removed by natural weathering.
CASTLEBROOK™ GENERAL INSTRUCTIONS
1.) GENERAL INSTRUCTIONS
The lifetime limited warranty option is only available for individual single‐family site built detached residence. A 50 year limited warranty would apply to all property owned by government agencies, corporations, limited liability companies, partnerships, trusts, religious organizations, schools, or school districts, condominiums, or cooperative housing arrangements, or installed on apartment buildings or any type of building or premises not used by individual homeowners for a single family site built detached residence.
These shingles are warranted against manufacturing defects and wind gusts up to 110 MPH WITH 6 NAIL INSTALLATION ONLY FOR SHINGLES WITH THE “BUILT WITH HP42 TECHNOLOGY DESIGNATION”.
The Castlebrook™ Limited Warranty can be obtained by visiting www.AtlasRoofing.com/Warranty, or by writing to: Atlas Roofing Corporation, Attn: Consumer Services Department, 802 Hwy 19 N., Suite 170, Meridian, Mississippi, 39307. The following instructions must be followed to qualify for protection under the Castlebrook™ Limited Warranty.
Important: See special instructions below for Low Slope Applications. See special instructions below for Steep Slope/Mansard/ 6‐Nail application. To obtain stated area coverage and to achieve design performance and appearance, the directions on this package must be followed. Sealing of the adhesive strips on each shingle to the shingle beneath is created by heat from sunlight. Atlas Roofing Corporation also endorses the Asphalt Roofing Manufacturers Association’s (ARMA) recommendations for application details not specified within this text.
2.) ROOF DECK VENTILATION
Adequate ventilation under the roof deck must be provided to prevent harmful condensation in winter and heat build‐up in summer. These conditions can cause: A. Accelerated shingle weathering B. Deck rot and attic fungus C. Shingle distortion/ cracking due to deck movement D. Cosmetic blisters on the shingle surface. Atlas will not be responsible for damage to shingles as a result of inadequate ventilation. Ventilation provisions must meet or exceed current FHA Minimum Property Standards and conform to all building codes and regulations. To best ensure adequate ventilation and circulation of air, a combination of vents at the ridge and eaves should be used. All roof structures, especially mansard and cathedral type ceilings, must have complete through ventilation from eave area to the ridge area. FHA Minimum Property Standards require 1 square foot of net free attic vent area for every 150 square feet of attic floor area; or one square foot per every 300 square feet, if vapor barrier is installed on the warm side of the ceiling, or at least one half the ventilation area is provided near the ridge.
3.) ROOF DECK
These instructions are for the application of Atlas asphalt shingles to nominal 3/8” or 7/16” thick American Plywood Association (APA/TECO) rated, code approved plywood, OSB decks or minimum ¾” actual thickness, wood decking . The plywood or non‐veneer (OSB) decks must comply with the roof deck specifications of APA/TECO. Solid wood decking must be well seasoned, not over 6” (nominal) width, and fastened securely to each rafter. The deck surface must be clean, bare, gap free and flat. Castlebrook™ shingles must not be applied to any surface other than roof deck types described here. Atlas also honors its Shingle Limited Warranty when Atlas shingles are installed on the Atlas CrossVent® Nailable Insulation panels. Atlas will not be responsible for the performance of its shingles if applied directly to non‐vented, insulated decks composed of perlite board, plastic foam, fiberboard, gypsum plank, lightweight concrete, cementitious wood fiber, or similar materials or to any decks with insulation installed directly to the underside of the decking, with the exception of CrossVent® Nailable Insulation. Spray foam insulation applied directly to the bottom of the decking will void the warranty. Atlas shingles may be installed over a roof system containing a radiant barrier material if: 1. the required full, flow through ventilation is maintained directly under the decking material in all cases, 2. the radiant barrier material is highly vapor permeable ( > 2 perms), and, 3. the radiant barrier is installed on the underside of or below the decking — not used as an underlayment above the decking. Spray‐on types of below deck vapor permeable radiant barriers will be considered only on a job by job basis, and only if tests confirm > 2 perms or greater vapor permeability.
4.) UNDERLAYMENT
Atlas highly recommends the use of high performance, ASTM 6757 compliant - Gorilla Guard® Everfelt™ or Summit® proprietary underlayment products for long term roof system performance and WeatherMaster® products self-adhering, waterproofing underlayment for critical areas, such as valleys and eaves. Atlas does not approve the use of any self-described, metalized or metal containing category of “Radiant Barrier”, as an asphalt shingle underlayment installed above the deck. Use of these types of radiant barrier would void the shingle warranty. Underlayment must be applied flat and unwrinkled. Building codes vary with geographic areas, and the installation must comply with local building codes or shingle manufacturer’s requirements, whichever is stricter. Shingles should be applied as soon as possible after the application of organic underlayment felt, which is not intended for prolonged exposure. Atlas recommends that the shingles be applied the same day as the felt underlayment application to avoid wetting and wrinkling. If an underlayment is used for prolonged dry-in, Atlas recommends Summit® Synthetic Underlayment as the dry-in underlayment, for up to 6 months exposure.
Standard Slope Application: Proper application requires that a single layer of approved underlayment be applied to decks with slopes 4:12 (> 18.4°) up to 21:12 (<60°) and consistent with all applicable building codes. This approved underlayment is a required roof assembly component to maintain a Class A fire rating of the deck assembly. Install underlayment over the entire deck, parallel to the eaves, overhanging 1/4” to 3/8”, with fasteners placed 2” from the deck edge, 12” O.C. across the lower edge and with 2” overlap parallel to eaves and with 4” min. end lap, parallel to the rake. Underlayment end laps shall be staggered 6 feet apart from the adjacent courses. Corrosion-resistant drip edge should be placed over the underlayment at the rake and beneath the underlayment at the eaves.
Low Slope Application: 2:12 (>9.5°) up to 4:12 (>18.4°) (51mm/305mm) on slopes of 2” to 4” rise per foot, a double layer of approved underlayment over the entire deck surface is required. Atlas WeatherMaster Ice & Water products are highly recommended as the underlayment for low slope roofs to cover the entire deck prior to installing shingles. In low slope applications, slopes between 2:12 and 4:12, it is acceptable to install a single layer of WeatherMaster products either on partial or for entire deck coverage. As an alternative option, a double layer of approved underlayment can be installed over the entire deck surface is required. Starting with a 19” wide strip at eaves and overhanging the eaves 1/4” to 3/8”, cover the first 19” course with a full 36” wide strip. Expose the first course 17” and continue up the deck with 36” wide strips, lapping each course 19” over the preceding course - providing a 17” exposure. End laps for low slopes shall be of at least 12” overlap and staggered 6 feet apart. Install drip edge over the underlayment at the rake and beneath the underlayment at the eaves
5.) FLASHING
All flashing should be in place before shingles are installed. Cap flashings of sheet metal and base flashings of metal or mineral surfaced roll roofing should be used at vertical surfaces such as chimneys, skylights, vents, walls, etc. All flashings should be sealed with asphalt plastic cement. Consult the Residential Asphalt Roofing Manual published by the Asphalt Roofing Manufacturers Association (ARMA) for details concerning specific methods and types of flashing installation.
6.) ICE DAM PROTECTION
Eave and rake edge waterproof flashings must be installed per local building codes and where there is a possibility of icing along the eaves and rake edges causing a potential for ice damming and a backup of water. Atlas’s WeatherMaster® products, or equivalent must be applied directly over the decking according to application instructions provided with the product, and local building codes. The waterproof flashing material must extend up the roof at least 24” beyond the interior warm wall line, and in areas of severe icing, at least up to the highest water level expected to occur from ice dams. If the overhang requires flashing wider than 36”, the horizontal lap must be located on the overhang area and cemented or sealed. End laps must be 12” (minimum) and cemented/sealed. WeatherMaster® products, as supplied by Atlas, are recommended as the first layer of Ice Dam Protection. WeatherMaster® products conform to ASTM D 1970.
7.) VALLEYS
Valleys must be installed before Castlebrook™ shingles are applied.
Open Valley: Apply a 36” ice & water product centered in the valley. Install 16” wide minimum copper flashing (or equivalent) also centered in valley. Secure the copper flashing every 24” along both edges either with copper cleats or large head copper nails with the shanks immediately adjacent to the copper edge. Overlaps in the copper must be a minimum of 12”.
Strike chalk lines on each side of the copper valley 3” from the center line. As shingles are applied, trim them to chalk lines and, to direct water into valley, cut 2” diagonally off upper corner of shingles adjacent to chalk line. Set valley edge of each shingle in a 3” wide band of asphalt plastic cement meeting ASTM D 4586 and nail no closer than 6” from valley center line. See Diagram #1.
Closed Cut Valley: Apply a 36” wide ice & water product centered in the valley, nailing 2” from outer edges only. Apply all shingles on one side of valley and across center of valley, a minimum of 12”. Nail a minimum of 6” away from the center line of the valley on the unshingled side and strike a chalk line 2” from the center line on the un‐shingled side. Apply shingles on the unshingled side up to the chalk line and trim. Do not cut the underlying shingle.
Cut upper corners of the shingle, cement and nail. See Diagram #2.


8.) FASTENING
Placement of nails is critical to overall performance. High nail placement can result in separation of components and will cause delamination of the shingles after application. All nails must be driven straight with the heads flush to the shingle surface, never cutting into the shingle. Nails must not be exposed (visible) on the finished roof. Delamination after installation does not justify a warranty claim.
FASTENERS: Nails must be 11 OR 12 gauge corrosion-resistant roofing nails with 3/8” minimum head. Nails must be long enough to penetrate the roof deck 3/4” or if the deck is less than 3/4” thick, the nails should be long enough to penetrate fully and extend at least 1/8” through the roof deck. Nails may be placed in the sealant line.
NEW ROOFING APPLICATION (first shingle layer): 4 nails are required per shingle. The nails are to be located 7” up from the bottom edge of the shingle, with one nail placed approximately 1” from each side of the shingle, and the remaining two equally spaced between the two outer nails as illustrated in the diagram. NAILS MUST BE MINIMUM OF 1-1/4” LONG. See Diagram #3.
RE-ROOFING APPLICATION (second shingle layer): Requires the same nail placement as New Roofing. NAIL PLACEMENT IS IMPORTANT FOR WIND RESISTANCE. INCORRECTLY PLACED NAILS WILL VOID WIND COVERAGE OF WARRANTY. (See Section #12)
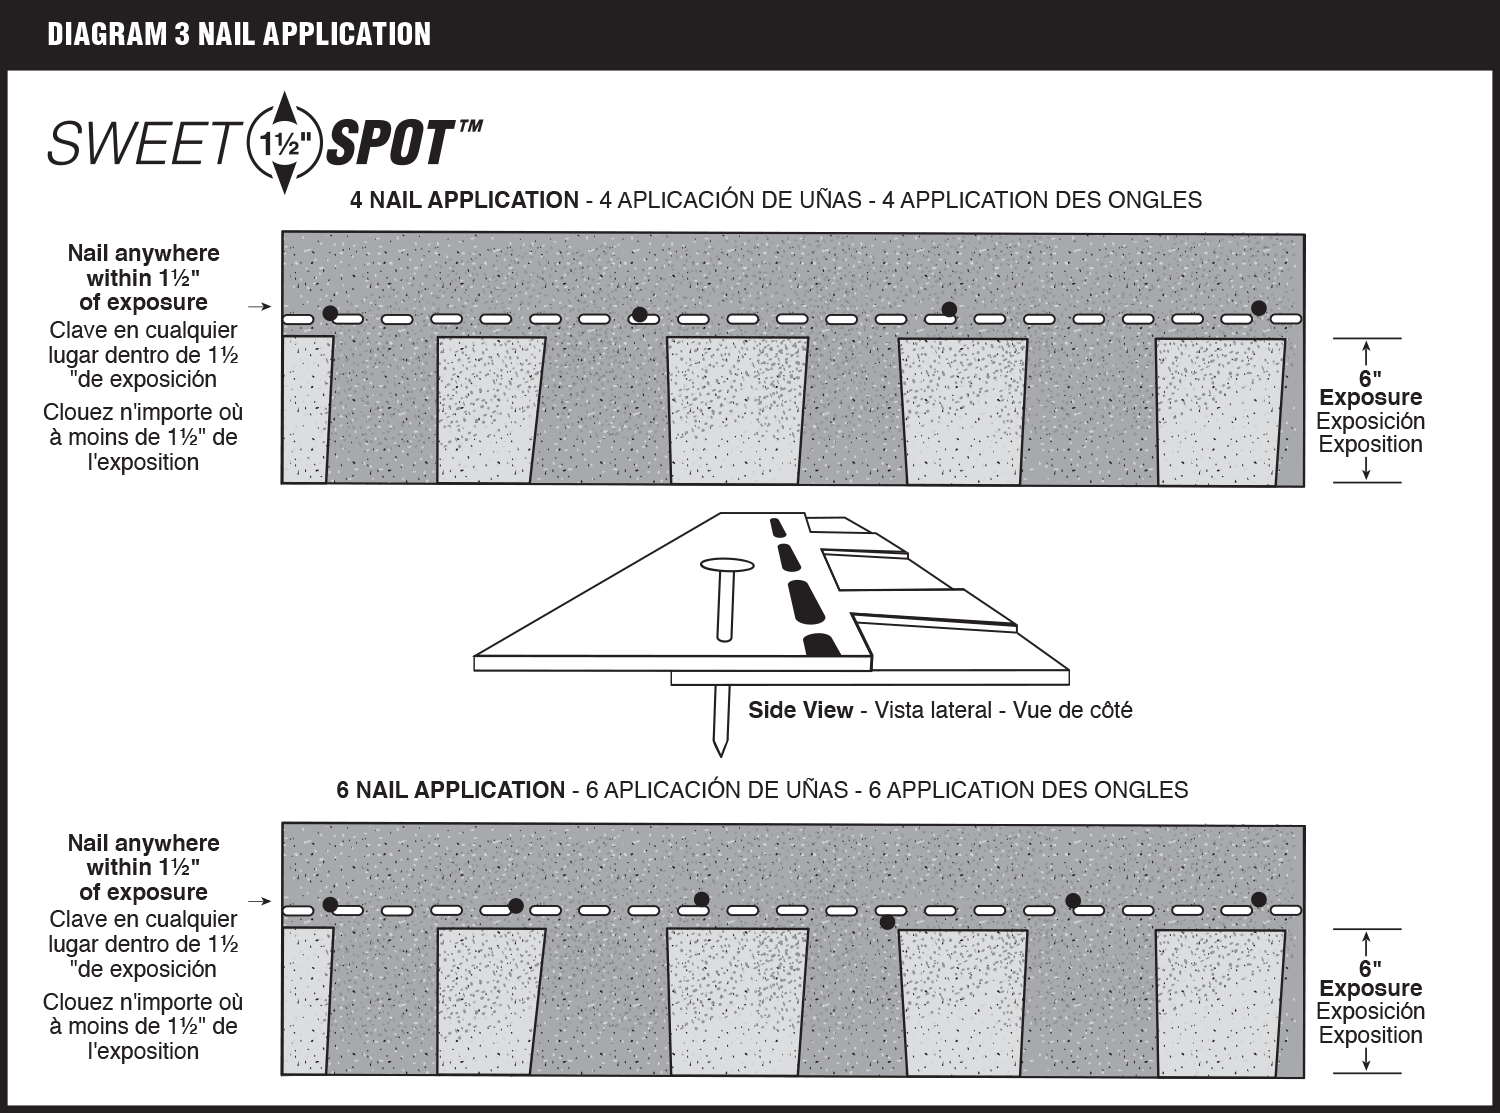
9.) APPLICATION
Prepare deck with an approved roof underlayment, drip edges and flashings as recommended. Horizontal and vertical chalk lines should be utilized to ensure proper shingle alignment from eave to ridge.
Starter Course: Use PRO-CUT® STARTER SHINGLE or 3-tab shingle for the starter course. Trim off tabs and apply with 1/4” to 3/4” overhang on the eaves. Note the seal-down feature should be in line with the eave. In order to offset seams, cut 6” off the left end of the first shingle. Begin application at lower left rake of roof, and then continue across with full-length shingle, nailed with 4 nails equally spaced across the shingle and nailed 3” up from the eave. See Diagram #4.
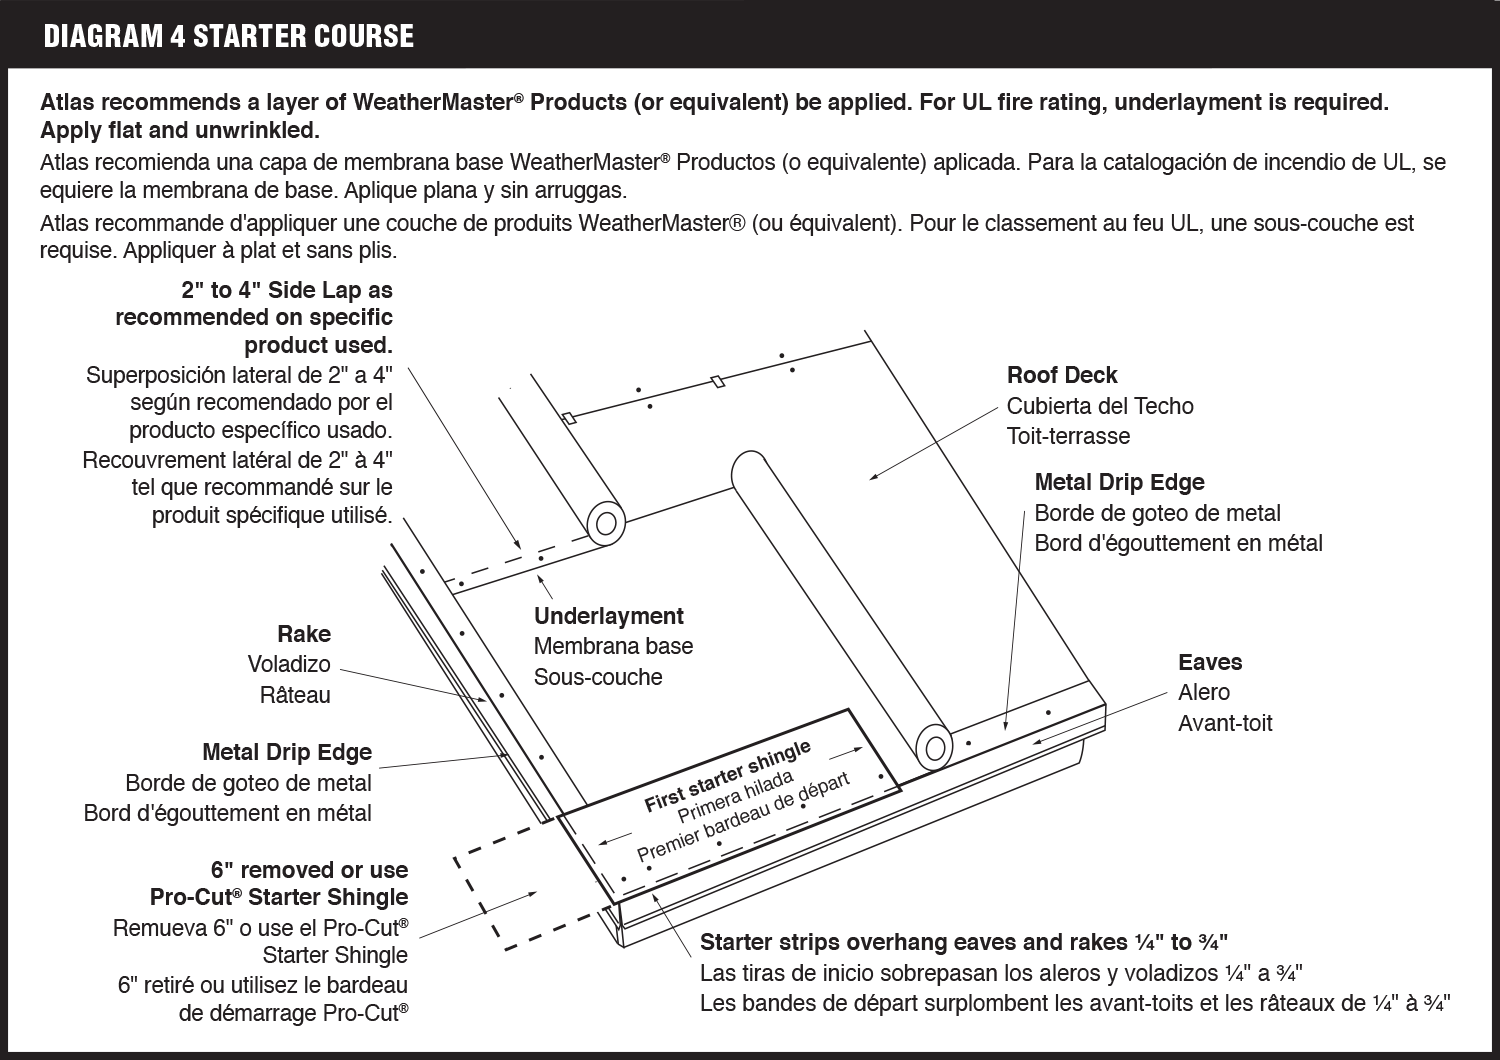
Note: Existing product manufactured with a 39 3/8” width (specified for installation at a 5” offset) can be installed with the new 42” width size format (specified for installation at a 6” offset) as long as you follow the “when mixing product” instructions.
WHEN MIXING PRODUCT: Always ensure the overlap between shingles is never less than 5” by checking and measuring below and above the transition course. Check your seams to ensure it is never less than 5”, then make the appropriate periodic cuts on your transition course.
Note: For maximum material application and color blend efficiencies Atlas recommends a 6” offset pattern. ARMA Best practices manual allows for an installation of not less than 4” and not greater than 8”.
First Course: Begin first full shingle at lower left rake of roof or right of vertical chalk line and continue course across roof with full shingles laid flush with starter course and fastened with 4 nails, placed as specified. Note: an optional band of asphalt plastic cement meeting ASTM D-4586 may be applied to the rake of the roof with each shingle course to enhance wind resistance and to resist wind driven rain infiltration. See Diagram #5.
Second Course: Cut 6” off the left end of a shingle and apply the remaining larger piece over the first course shingle, flush with the left edge and exposing the first course 6”. Proceed with full shingle across roof maintaining 6” exposure. Save the 6” piece for starting course 7. See Diagram #5.
Third Course: Cut 12” off the left edge of a shingle and apply the remaining larger piece over the second course shingle, flush with the left edge and exposing the second course 6”. Proceed with full shingle across roof maintaining 6” exposure. Save the 12” piece for starting course 6. See Diagram #5.
Fourth Course: Cut 18” off the left edge of a shingle and apply the remaining larger piece over the third course shingle, flush with the left edge and exposing the third course 6”. Proceed with full shingle across roof maintaining 6” exposure. Save the 18” piece for starting course 5. See Diagram #5.
Fifth Course: Apply the 18” piece that was cut starting the proceeded (4th course) or cut 24” off the left edge of a shingle and apply the remaining 18” piece over the fourth course, flush with the left edge and exposing the fourth course 6”. Proceed with full shingle across roof maintaining 6” exposure. See Diagram #5.
Sixth Course: Apply the 12” piece that was cut starting the 3rd course or cut 30” off the left edge of a shingle and apply the remaining 12” piece over the fifth course, flush with the left edge and exposing the fifth course 6”. Proceed with full shingle across roof maintaining 6” exposure. See Diagram #5.
Seventh Course: Apply the 6” piece that was cut starting the 2nd course or cut 36” off the left edge of a shingle and apply the remaining 6” piece over the sixth course, flush with the left edge and exposing the sixth course 6”. Proceed with full shingle across roof maintaining 6” exposure. See Diagram #5.

Course Completion: Begin eighth course application cycle, with full shingle (same as First Course method) and continue with full shingle across roof. Continuation of this staggered course cycle must be followed to achieve correct pattern appearance.
Note: Existing product manufactured with a 39 3/8” width (specified for installation at a 5” offset) can be installed with the new 42” width size format (specified for installation at a 6” offset) as long as you follow the “when mixing product” instructions.
WHEN MIXING PRODUCT: Always ensure the overlap between shingles is never less than 5” by checking and measuring below and above the transition course. Check your seams to ensure it is never less than 5”, then make the appropriate periodic cuts on your transition course.
10.) STEEP SLOPE AND MANSARD APPLICATIONS
Immediately upon application to slopes exceeding 60°(or 21:12), apply six (6) quarter size spots of asphalt plastic cement under each shingle. All six spots are to be approximately 1” up from the bottom edge of the shingle and spaced equally across the shingle with the two outer spots located 1” in from each outer edge. The cement should not be exposed when shingles are pressed into position. Excessive use of roofing cement can cause shingles to blister.
CAUTION: STEEP SLOPE AND MANSARD APPLICATIONS BOTH REQUIRE 6 NAILS EVENLY SPACED ALONG THE LENGTH OF EACH SHINGLE.
11.) HIP AND RIDGE
Use Atlas Pro- Cut® Hip & Ridge or Atlas Pro- Cut® High Profile Hip & Ridge. To prevent cracking in cold climates when applying to hips and ridges, shingles must be sufficiently warm and flexible. Apply Atlas Pro-Cut® Hip & Ridge shingles with a 5 5/8” exposure, beginning at the bottom of the hip or from the end of the ridge in the direction opposite of prevailing winds. Use two nails per shingle, as specified under Section 8– Fastening, with one nail on each side, 6” back from the exposed end and 1” up from the edge so succeeding shingles conceal nail heads. Trim final shingle to fit and set in plastic cement. See Diagram #6. When installing ridge vents follow vent manufacturer’s instructions.
Separate the Pro-Cut® Hip & Ridge shingle into three equal pieces along the perforated lines provided. Bend each piece lengthwise to provide equal exposure on both sides of the ridge. Allow 5 5/8” of exposure and nail 6” from exposed butt edge with 2 nails—1” from each side. The direction of the exposed end should be away from the prevailing wind. One bundle of shingles will provide approximately 31 lineal feet of ridge coverage when applied in accordance with these instructions.

12.) RE-ROOFING OVER ASPHALT SHINGLES
Replace all missing shingles. Split and securely nail all buckles, raised tabs or curled shingles. Ensure attic ventilation complies with FHA Minimum Property Standards as stated previously. Install a layer of number 30 felt underlayment to maintain a Class A fire rating. Asphalt Felt is to be applied over the old shingles and then proceed with the new shingles as if applying a new roof.
DIAGRAM 6 IMPORTANT: Atlas recommends 2” nails for a roof over. See Section 8.
ATLAS ROOFING CORPORATION DOES NOT APPROVE RE‐ROOFING OVER EXISTING WOOD SHINGLES OR LAMINATED ASPHALT SHINGLES.
MINIMUM STANDARD SLOPE REQUIREMENT AND INSTRUCTIONS APPLY TO NOT LESS THAN 4 INCHES PER FOOT. LOW SLOPE REQUIREMENT AND INSTRUCTIONS APPLY TO NOT LESS THAN 2 INCHES PER FOOT.
WARNINGS & PRECAUTIONS
WARNING: Roofing application can be dangerous. All necessary precautions and safety guidelines should be observed in accordance with proper roofing trade practices. Every effort should be made to keep roof traffic to a minimum. Regular roof maintenance should be performed in the cooler parts of the day.
Important Precautions: Store on flat surface. Protect from weather during storage and on job site. Sealant protection tape is placed on the back of each shingle and does not have to be removed before applying.
DISCOLORATION: Some shading or variations in the colors may occur due to positioning or embedment of the granule. When asphalt shingles are packaged, they are under a certain amount of pressure due to weight. Minor staining may occur. While in storage, they may also pick up varying amounts of backing material used to keep the shingles from sticking together. These discolorations are temporary and are removed by natural weathering.
PRO-CUT& HIP & RIDGE GENERAL INSTRUCTIONS
These instructions MUST be followed to ensure desired appearance and maximum performance.
For use on new or re-roofing applications over code required types of roof decks.
Roof Deck: A properly installed and conditioned, code approved, roof deck constructed of exterior grade plywood, minimum thickness of nominal 3/8”, or alternatively 7/16” thickness APA rated non-veneer oriented strand board (OSB) structural panel should be used, as a minimum.
Roof Deck Ventilation
Atlas will not be responsible for damage to shingles as a result of inadequate ventilation. Ventilation provisions must meet or exceed current FHA Minimum Property Standards and conform to all building codes and regulations. All roof structures, including Gable, Mansard, Hip and Cathedral type roof constructions, must have complete, flow through ventilation from eaves to the ridges. FHA Minimum Property Standards require one sq. ft. of net free ventilation area for each 150 sq. ft. of space to be vented; or one sq. ft. per 300 sq. ft., if a vapor barrier is installed on the warm side of ceiling, or if at least one half the ventilation area is provided near or at the ridge.
Fasteners: Only 3/8” dia. head, roofing nails are recommended for the attachment of Pro-Cut® Hip & Ridge shingles. For designated high wind applications, Atlas recommends double nailing each Pro-Cut ® shingle by driving the second nail 1” behind the first nail, i.e., 1 nail each at 6” and 7” from the leading edges of the Pro-Cut® shingles. Use galvanized 3/8” diameter head roofing nails long enough to penetrate through the deck panel or 3/4” into solid wood decking. (11/2” nails minimum, or longer when shingling over a ridge vent product).
Storage: These shingles can be damaged by careless and improper storage or handling. Keep shingles covered and protected from weather, keep dry and reasonably cool. Do not stack over 12 bundles high. Manufacturer is not responsible for a slight variation in color which may occur from the positioning of the granular surfacing material used in this product. The manufacturer is not responsible for the installed appearance by any other application method.
Pro-Cut® Hip & Ridge Shingles are produced from the same high quality materials that are used to manufacture the heavyweight StormMaster® family of shingles. The double layer coverage method will provide a longer service life and provide a more distinct profile.
Exposure: 5 5/8 inches for all Pro-Cut H&R shingles. (1 bundle covers 31 linear feet – installed, single coverage).
Warranty:
Pro-Cut® Hip &
Ridge shingles are warranted in the Atlas Shingle Limited Warranty to match the warranty terms of
the matching Atlas Shingles installed on the field of the roof deck.
Pro-Cut® Hip & Ridge shingles installed with non-Atlas manufactured shingles covering the field of the deck will be covered by a materials only warranty provision of 20 years - prorated straight line from the date of installation.
Application Instructions
Application Instructions: (This method is to be used whether installing directly to the field shingles or onto a ventilated ridge product – always use nails long enough to penetrate through the decking as these H&R fasteners are also securing the ridge vent to the deck.)
- Separate the Pro-Cut® Hip & Ridge master shingle into three equal pieces along the perforated lines provided.
- Bend each piece lengthwise to provide equal exposure on both sides of the ridge. Allow shingle to warm prior to bending.
- Allow 5 5/8” of weather exposure and nail 6” from exposed butt edge with 2 nails‚ 1” from each side. Use the alignment notches, illustrated below, for proper exposure alignment. Align the bottom of the shingle with the alignment notch on the previously installed shingle.
- For high wind applications, Atlas recommends double nailing each Pro-Cut® shingle by driving a second nail 1” behind the first nail, i.e., 1 nail each at 6” and 7” from the front edge of the Pro-Cut® shingles.
- The direction of the exposed ends of the Pro-Cut® H&R shingles should be installed facing away from the prevailing wind.
Special Design Instructions: For an enhanced, bolder, appearance with the Pro-Cut® Hip & Ridge shingles, use a double layer of shingles. Fasten in the same manner as the single layer application shown. Be sure to use fasteners of sufficient length to penetrate through the roofing material and at least 3/4” into a lumber deck or through a plywood deck (2” long).
One bundle of Pro-Cut® H& R shingles will provide approximately 16 linear feet ridge coverage using the double layered enhanced ridge.

STORMMASTER® HIP & RIDGE GENERAL INSTRUCTIONS
These instructions MUST be followed to ensure desired appearance and maximum performance.
For use on new or re-roofing applications over code required types of roof decks.
Roof Deck: A properly installed and conditioned, code approved, roof deck constructed of exterior grade plywood, minimum thickness of nominal 3/8”, or alternatively 7/16” thickness APA rated non-veneer oriented strand board (OSB) structural panel should be used, as a minimum.
Roof Deck Ventilation
Atlas will not be responsible for damage to shingles as a result of inadequate ventilation. Ventilation provisions must meet or exceed current FHA Minimum Property Standards and conform to all building codes and regulations. All roof structures, including Gable, Mansard, Hip and Cathedral type roof constructions, must have complete, flow through ventilation from eaves to the ridges. FHA Minimum Property Standards require one sq. ft. of net free ventilation area for each 150 sq. ft. of space to be vented; or one sq. ft. per 300 sq. ft., if a vapor barrier is installed on the warm side of ceiling, or if at least one half the ventilation area is provided near or at the ridge.
Fasteners: Only 3/8” dia. head, roofing nails are recommended for the attachment of StormMaster® Hip & Ridge shingles. For designated high wind applications, Atlas recommends double nailing each StormMaster® shingle by driving the second nail 1” behind the first nail, i.e., 1 nail each at 6” and 7” from the leading edges of the StormMaster® shingles. Use galvanized 3/8” diameter head roofing nails long enough to penetrate through the deck panel or 3/4” into solid wood decking. (11/2” nails minimum, or longer when shingling over a ridge vent product).
Storage: These shingles can be damaged by careless and improper storage or handling. Keep shingles covered and protected from weather, keep dry and reasonably cool. Do not stack over 12 bundles high.
Manufacturer is not responsible for a slight variation in color which may occur from the positioning of the granular surfacing material used in this product. The manufacturer is not responsible for the installed appearance by any other application method.
StormMaster® Hip & Ridge Shingles are produced from the same high quality materials that are used to manufacture the heavyweight StormMaster® family of shingles. The double layer coverage method will provide a longer service life and provide a more distinct profile.
Exposure: 5 5/8 inches for all StormMaster® H&R shingles. (1 bundle covers 31 linear feet – installed, single coverage).
Warranty:
StormMaster® Hip & Ridge shingles are warranted in the Atlas Shingle Limited Warranty to match the
warranty terms of the matching Atlas Shingles installed on the field of the roof deck.
StormMaster® Hip & Ridge shingles installed with non-Atlas manufactured shingles covering the field of the deck will be covered by a materials only warranty provision of 20 years - prorated straight line from the date of installation.
Application Instructions
Application Instructions: (This method is to be used whether installing directly to the field shingles or onto a ventilated ridge product – always use nails long enough to penetrate through the decking as these H&R fasteners are also securing the ridge vent to the deck.)
- Separate the StormMaster® Hip & Ridge master shingle into three equal pieces along the perforated lines provided.
- Bend each piece lengthwise to provide equal exposure on both sides of the ridge. Allow shingle to warm prior to bending.
- Allow 5 5/8” of weather exposure and nail 6” from exposed butt edge with 2 nails‚ 1” from each side. Use the alignment notches, illustrated below, for proper exposure alignment. Align the bottom of the shingle with the alignment notch on the previously installed shingle.
- For high wind applications, Atlas recommends double nailing each StormMaster® shingle by driving a second nail 1” behind the first nail, i.e., 1 nail each at 6” and 7” from the front edge of the StormMaster® shingles.
- The direction of the exposed ends of the StormMaster® H&R shingles should be installed facing away from the prevailing wind.
Special Design Instructions: For an enhanced, bolder, appearance with the StormMaster® Hip & Ridge shingles, use a double layer of shingles. Fasten in the same manner as the single layer application shown. Be sure to use fasteners of sufficient length to penetrate through the roofing material and at least 3/4” into a lumber deck or through a plywood deck (2” long).
One bundle of StormMaster® H&R shingles will provide approximately 16 linear feet ridge coverage using the double layered enhanced ridge.

Pro-Cut® Universal Starter Shingles Application Instructions
Universal for use with shingles up to 8.5” exposure
Product Description
Pro-Cut® Starter Shingles protect the roof edge and provide the hold-down features needed to provide high wind resistance at the critical roof areas of the eaves and rakes. Pro-Cut® Starter Shingles are designed as a starter course before installing the first course of shingles.
Key Properties
- No need to cut tabs or invert shingles saving time and labor costs
- Seal down strip prevents wind uplift
- Use with any asphalt shingles
- Required with Atlas Signature Select® Roofing System
Application
Pro-Cut® Starter Shingles can be installed starting at either end of the eave. Begin installing the Starter Shingles from the same end you intend to start the first course of field shingles.
- Position the cut Starter Shingle at the end of the eave and place the fasteners such that they will not show through any cutouts of the first shingle course. Use the same nail type to fasten as the field shingles.
- Where the non-corrosive drip edges extend beyond the wood decking, Pro-Cut® Starter Shingles may be installed flush with the drip edge
- Proceed to install the field shingles per the instructions on the shingle wrapper
- Pro-Cut® Starter Shingles are formulated to be installed in ambient temperatures of 40°F and above


Starter Course
- Trim 6” of first shingle.
- Sealant line should always be positioned along eave.
- Overhang starter shingle ¼” to ¾” over eave.


